使用Velero 快速完成云原生应用迁移至备份集群中。

环境信息

集群A(生产):
master:192.168.11.6、192.168.11.13、192.168.11.16
lb:192.168.11.252
node:192.168.11.22
nfs:192.168.11.14
集群B(容灾):
master:192.168.11.8、192.168.11.10、192.168.11.17
lb:192.168.11.253
node:192.168.11.18
nfs:192.168.11.14

Velero安装部署

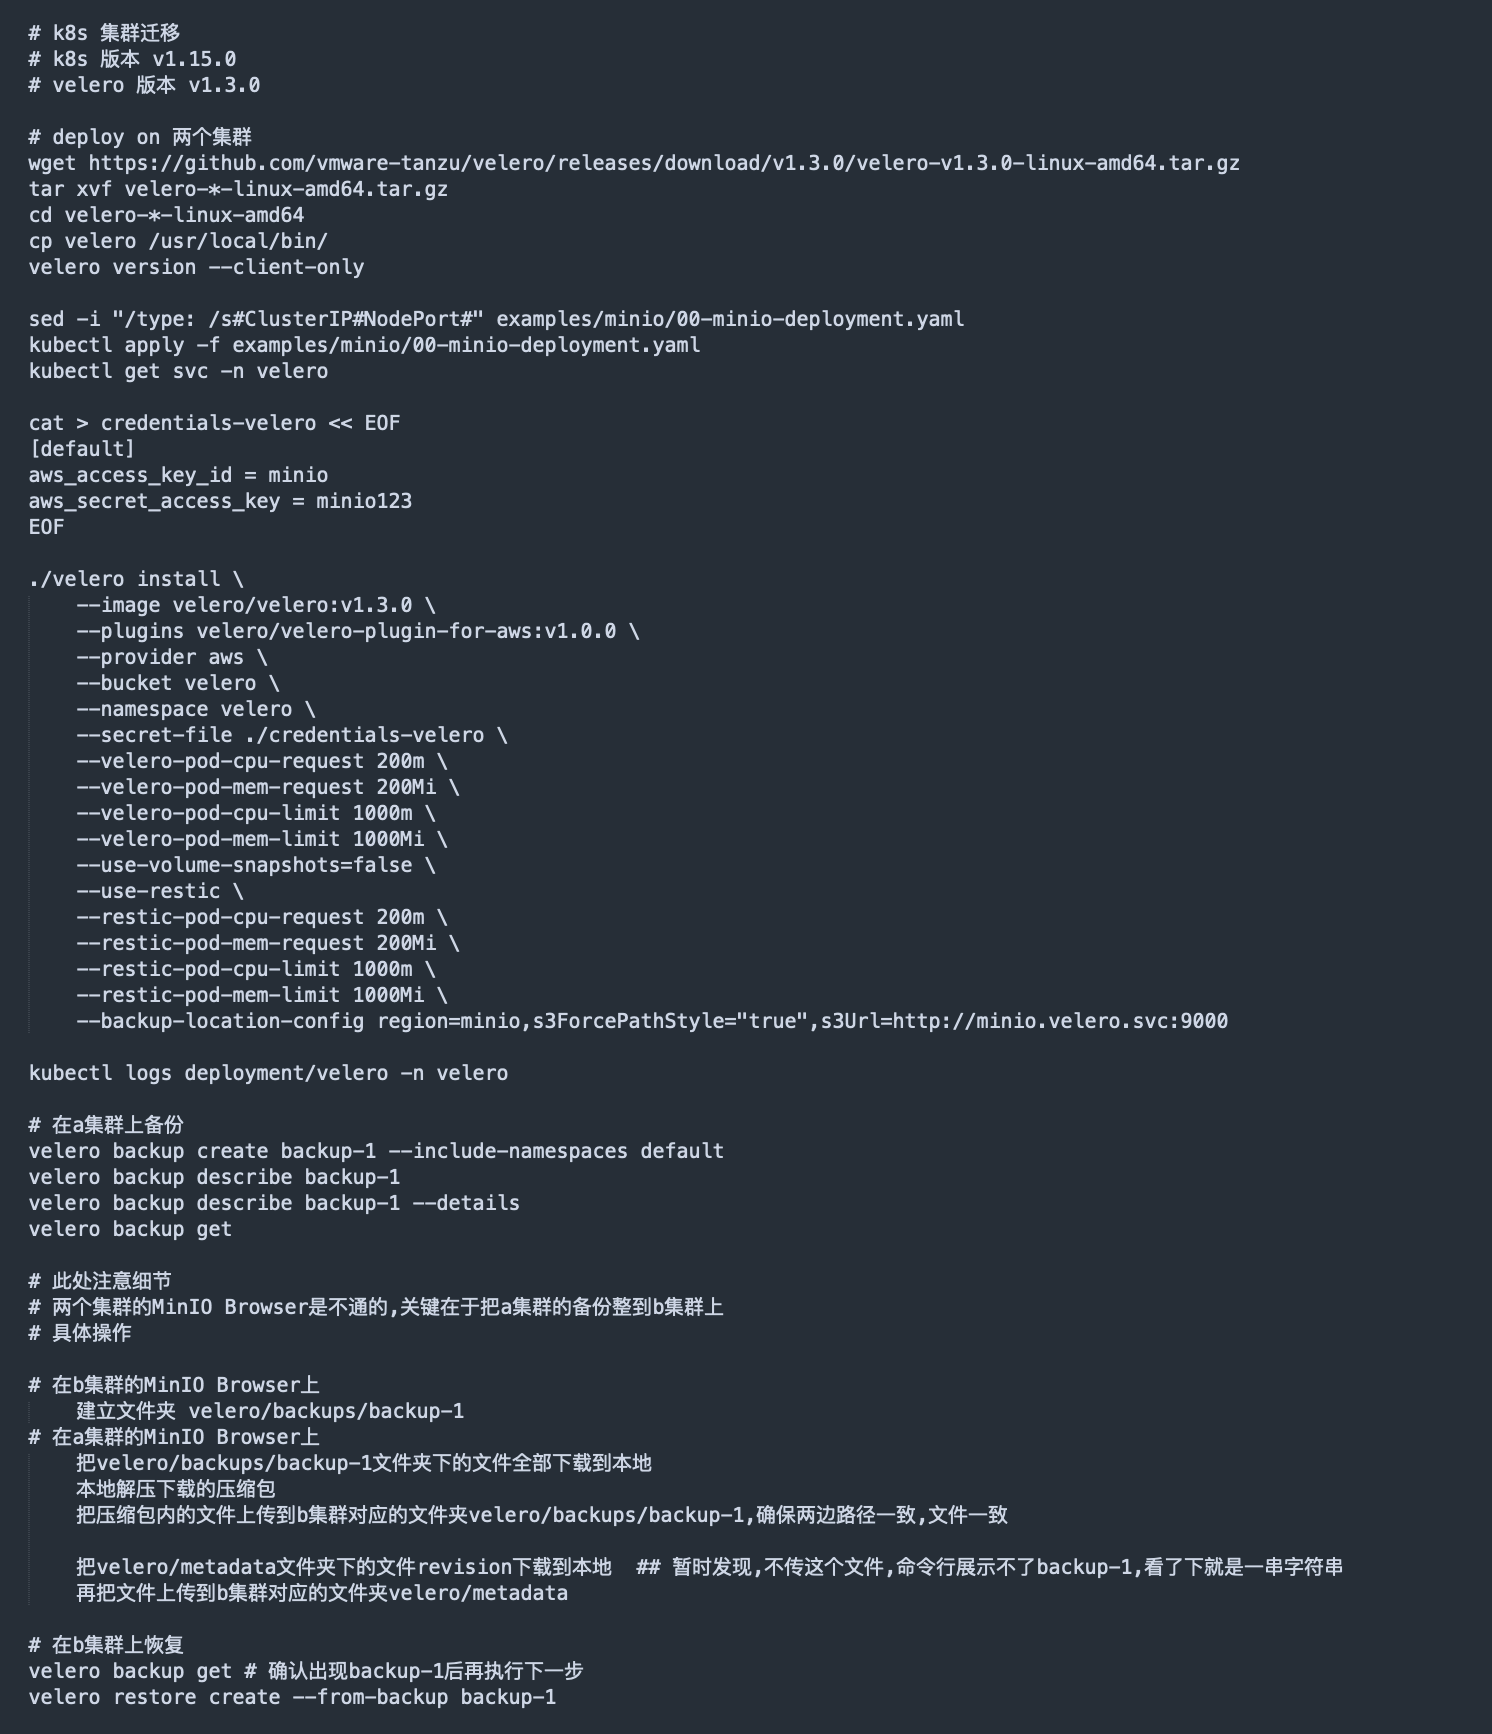
集群A和集群B都需要安装velero,安装过程参考官方文档velero安装,大致流程为:

1、安装velero客户端安装包,A和B集群都需要。
1.1、wget https://github.com/vmware-tanzu/velero/releases/download/v1.0.0/velero-v1.0.0-linux-amd64.tar.gz
1.2、解压安装包,且将velero拷贝至/usr/local/bin目录下。
2、安装velero服务端,A和B集群都需要。
2.1、本地创建密钥文件,vi credentials-velero
[default]
aws_access_key_id = minio
aws_secret_access_key = minio123
2.2、集群B环境,运下载和运行00-minio-deployment.yaml文件,且需要将其中的ClusterIP改成NodePort,添加nodePort: 31860,集群A环境不需要执行这步。
kubectl apply -f examples/minio/00-minio-deployment.yaml
2.3、集群B环境,启动服务端,需要在密钥文件同级目录下执行:
velero install \
    --provider aws \
    --bucket velero \
    --secret-file ./credentials-velero \
    --use-volume-snapshots=false \
    --backup-location-config region=minio,s3ForcePathStyle="true",s3Url=http://minio.velero.svc:9000 
	
	
2.4、集群A环境,启动服务端,注意:需要在集群A中获取velero的外部curl:
2.4.1、集群A中,kubectl get svc -n velero,获取9000映射的端口,如:9000:31860,根据情况而定
2.4.2、启动指令:
velero install \
    --provider aws \
    --bucket velero \
    --secret-file ./credentials-velero \
    --use-volume-snapshots=false \
    --backup-location-config region=minio,s3ForcePathStyle="true",s3Url=http://192.168.11.8:31860 

集群A数据的备份及集群B恢复

具体备份指令,定时备份,参考官方文档备份指令
在集群A中模拟了带有持久化的有状态和无状态的应用,备份维度以namespace为基准,为test。
备份指令为:velero backup create test-backup –include-namespaces test
集群A所有的机器关机且在机器B恢复验证:

[root@master1 velero-v1.2.0-linux-amd64]# velero restore create --from-backup test-backup
Restore request "test-backup-20191121141336" submitted successfully.
Run `velero restore describe test-backup-20191121141336` or `velero restore logs test-backup-20191121141336` for more details.
[root@master1 velero-v1.2.0-linux-amd64]# kubectl get ns
NAME                           STATUS   AGE
default                        Active   43h
demo                           Active   42h
kube-node-lease                Active   43h
kube-public                    Active   43h
kube-system                    Active   43h
kubesphere-controls-system     Active   43h
kubesphere-monitoring-system   Active   43h
kubesphere-system              Active   43h
openpitrix-system              Active   23h
test                           Active   12s
velero                         Active   24m
[root@master1 velero-v1.2.0-linux-amd64]# kubectl get pod -n test
NAME                             READY   STATUS    RESTARTS   AGE
mysql-v1-0                       1/1     Running   0          22s
tomcattest-v1-554c8875cd-26fz4   1/1     Running   0          22s
tomcattest-v1-554c8875cd-cmm2z   1/1     Running   0          22s
tomcattest-v1-554c8875cd-dc7mr   1/1     Running   0          22s
tomcattest-v1-554c8875cd-fcgn4   1/1     Running   0          22s
tomcattest-v1-554c8875cd-wqb4t   1/1     Running   0          22s
wordpress-v1-65d58448f8-g5bh8    1/1     Running   0          22s
2 个月 后
1 个月 后
# k8s 集群迁移
# k8s 版本 v1.15.0
# velero 版本 v1.3.0

# deploy on 两个集群
wget https://github.com/vmware-tanzu/velero/releases/download/v1.3.0/velero-v1.3.0-linux-amd64.tar.gz
tar xvf velero-*-linux-amd64.tar.gz
cd velero-*-linux-amd64
cp velero /usr/local/bin/
velero version --client-only

sed -i "/type: /s#ClusterIP#NodePort#" examples/minio/00-minio-deployment.yaml
kubectl apply -f examples/minio/00-minio-deployment.yaml
kubectl get svc -n velero

cat > credentials-velero << EOF
[default]
aws_access_key_id = minio
aws_secret_access_key = minio123
EOF

./velero install \
    --image velero/velero:v1.3.0 \
    --plugins velero/velero-plugin-for-aws:v1.0.0 \    
    --provider aws \
    --bucket velero \
    --namespace velero \
    --secret-file ./credentials-velero \
    --velero-pod-cpu-request 200m \
    --velero-pod-mem-request 200Mi \
    --velero-pod-cpu-limit 1000m \
    --velero-pod-mem-limit 1000Mi \
    --use-volume-snapshots=false \
    --use-restic \
    --restic-pod-cpu-request 200m \
    --restic-pod-mem-request 200Mi \
    --restic-pod-cpu-limit 1000m \
    --restic-pod-mem-limit 1000Mi \
    --backup-location-config region=minio,s3ForcePathStyle="true",s3Url=http://minio.velero.svc:9000

kubectl logs deployment/velero -n velero

# 在a集群上备份
velero backup create backup-1 --include-namespaces default
velero backup describe backup-1
velero backup describe backup-1 --details
velero backup get

# 此处注意细节
# 两个集群的MinIO Browser是不通的,关键在于把a集群的备份整到b集群上
# 具体操作

# 在b集群的MinIO Browser上
    建立文件夹 velero/backups/backup-1
# 在a集群的MinIO Browser上
    把velero/backups/backup-1文件夹下的文件全部下载到本地
    本地解压下载的压缩包
    把压缩包内的文件上传到b集群对应的文件夹velero/backups/backup-1,确保两边路径一致,文件一致

    把velero/metadata文件夹下的文件revision下载到本地  ## 暂时发现,不传这个文件,命令行展示不了backup-1,看了下就是一串字符串
    再把文件上传到b集群对应的文件夹velero/metadata

# 在b集群上恢复
velero backup get # 确认出现backup-1后再执行下一步
velero restore create --from-backup backup-1
2 个月 后

把minio独立部署到一台机器上,2个集群都使用这个外部minio。试过还原kubesphere吗?我还原安装好的kubesphere出现openebs的2个节点调度出问题启动不了。但是openebs 的本地主机存储可以用,还有个问题,静态手工分配的pv还原之后无法使用,需要手动删除pv里面和pvc绑定的字段 @wow @shaowenchen

    zhaolei0914

    我没有试过备份和恢复整个集群,只针对某个 PV annotate 之后进行备份和恢复