安装日志中,并未见到明显错误
kubectl get installplans devops -o yaml 查看devops的安装计划和状态详情。
kubectl -n kubesphere-devops-system get pod 查看devops组件是否都在正常运行。
安装日志中,并未见到明显错误
kubectl get installplans devops -o yaml 查看devops的安装计划和状态详情。
kubectl -n kubesphere-devops-system get pod 查看devops组件是否都在正常运行。
devops组件运行情况:

devops安装计划和状态详情:
apiVersion: kubesphere.io/v1alpha1
kind: InstallPlan
metadata:
annotations:
kubesphere.io/creator: admin
creationTimestamp: “2024-12-03T10:34:02Z”
finalizers:
generation: 8
name: devops
resourceVersion: “171506”
uid: 8f33f739-39ee-4c66-b171-693506b2e441
spec:
config: |+
extension:
apiserver:
replicas: 1
resources:
limits:
cpu: 500m
memory: 1024Mi
requests:
memory: 128Mi
cpu: 100m
agent: apiserver: replicas: 1 resources: limits: cpu: 500m memory: 1024Mi requests: memory: 128Mi cpu: 100m controller: replicas: 1 resources: limits: cpu: 500m memory: 1024Mi requests: cpu: 100m memory: 128Mi jenkins: securityRealm: openIdConnect: # The kubesphere-core api used for jenkins OIDC # If you want to access to jenkinsWebUI, the kubesphereCoreApi must be specified and browser-accessible # Modifying this configuration will take effect only during installation # If you wish for changes to take effect after installation, you need to update the jenkins-casc-config ConfigMap, copy the securityRealm configuration from jenkins.yaml to jenkins_user.yaml, save, and wait for approximately 70 seconds for the changes to take effect. kubesphereCoreApi: “http://ks-apiserver:30880” # The jenkins web URL used for OIDC redirect jenkinsURL: “http://devops-jenkins:30180” Master: resources: requests: cpu: 0.5 memory: 6Gi limits: cpu: 2 memory: 6Gi # recommend set same as requests.memory # smtp server settings for notification smtp: EMAIL_SMTP_HOST: “mail.example.com” EMAIL_SMTP_PORT: “465” EMAIL_USE_SSL: false EMAIL_FROM_NAME: “KubeSphere” EMAIL_FROM_ADDR: “admin@example.com” EMAIL_FROM_PASS: “P@ssw0rd” # sonarQube settings sonarqube: serverUrl: "“ authToken: ”“ persistence: size: 16Gi storageClass: ”" accessMode: ReadWriteOnce kubeconfigEnabled: true
enabled: true extension: name: devops version: 1.1.1 upgradeStrategy: Manualstatus: conditions: - lastTransitionTime: “2024-12-03T10:34:01Z” message: Install complete reason: InstallSuccessful status: “True” type: Installed - lastTransitionTime: “2024-12-03T10:33:59Z” message: The extension devops has been successfully initialized. reason: Initialized status: “True” type: Initialized configHash: 27c44748d145f42a enabled: true jobName: helm-executor-install-devops-mg6rxt releaseName: devops state: Installing stateHistory: - lastTransitionTime: “2024-12-03T10:33:59Z” state: Preparing - lastTransitionTime: “2024-12-03T10:34:00Z” state: Installing - lastTransitionTime: “2024-12-03T10:34:01Z” state: Installed - lastTransitionTime: “2024-12-03T10:34:02Z” state: Installing targetNamespace: kubesphere-devops-system version: 1.1.1
 hongmingK零SK壹S
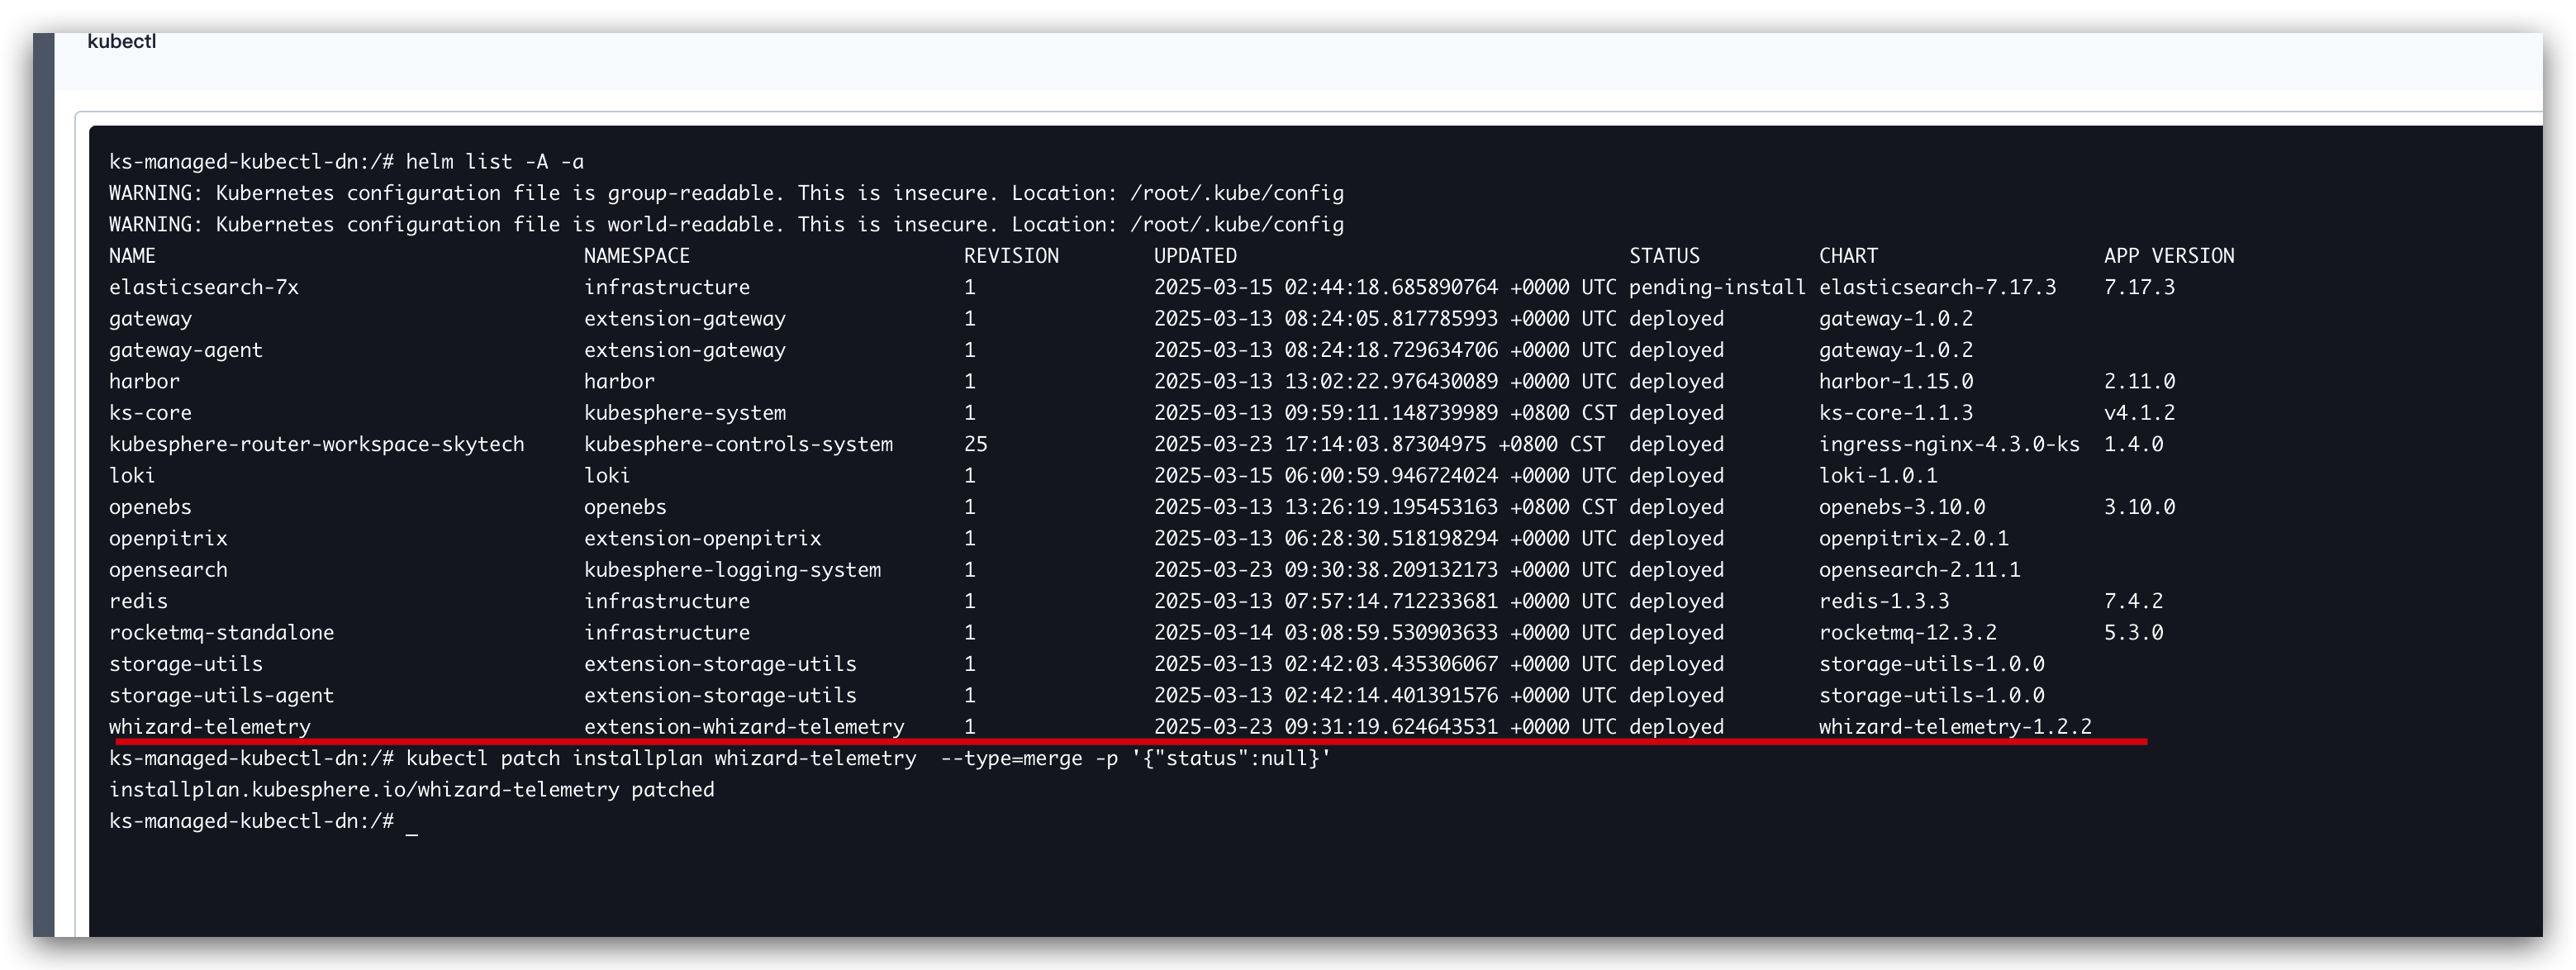
helm list -A -a
kubectl get installplan <Extension Name> -o yaml
对比一下事件的时间 helm release 的 UPDATED 不能早于 installplan Preparing 的时间
扩展组件安装过程是时间敏感的,需要保证节点时间同步
可以先配置 NTP 确保节点时间同步,通过这个 issue 跟进后续优化 kubesphere/kubesphere#6302
hongming 多谢,同步服务器时间后,重新执行安装任务,成功了。。
要是没有你提点,死也想不到是时间同步的问题-_-!!!
 rayzhou2017K零SK壹S
@小k 帮忙把这个帖子总结成 Q&&A 形式,按如下格式回复给我,总结的问题和答案要清晰完整。
Q: xxx
A: xxx
 小kK零S
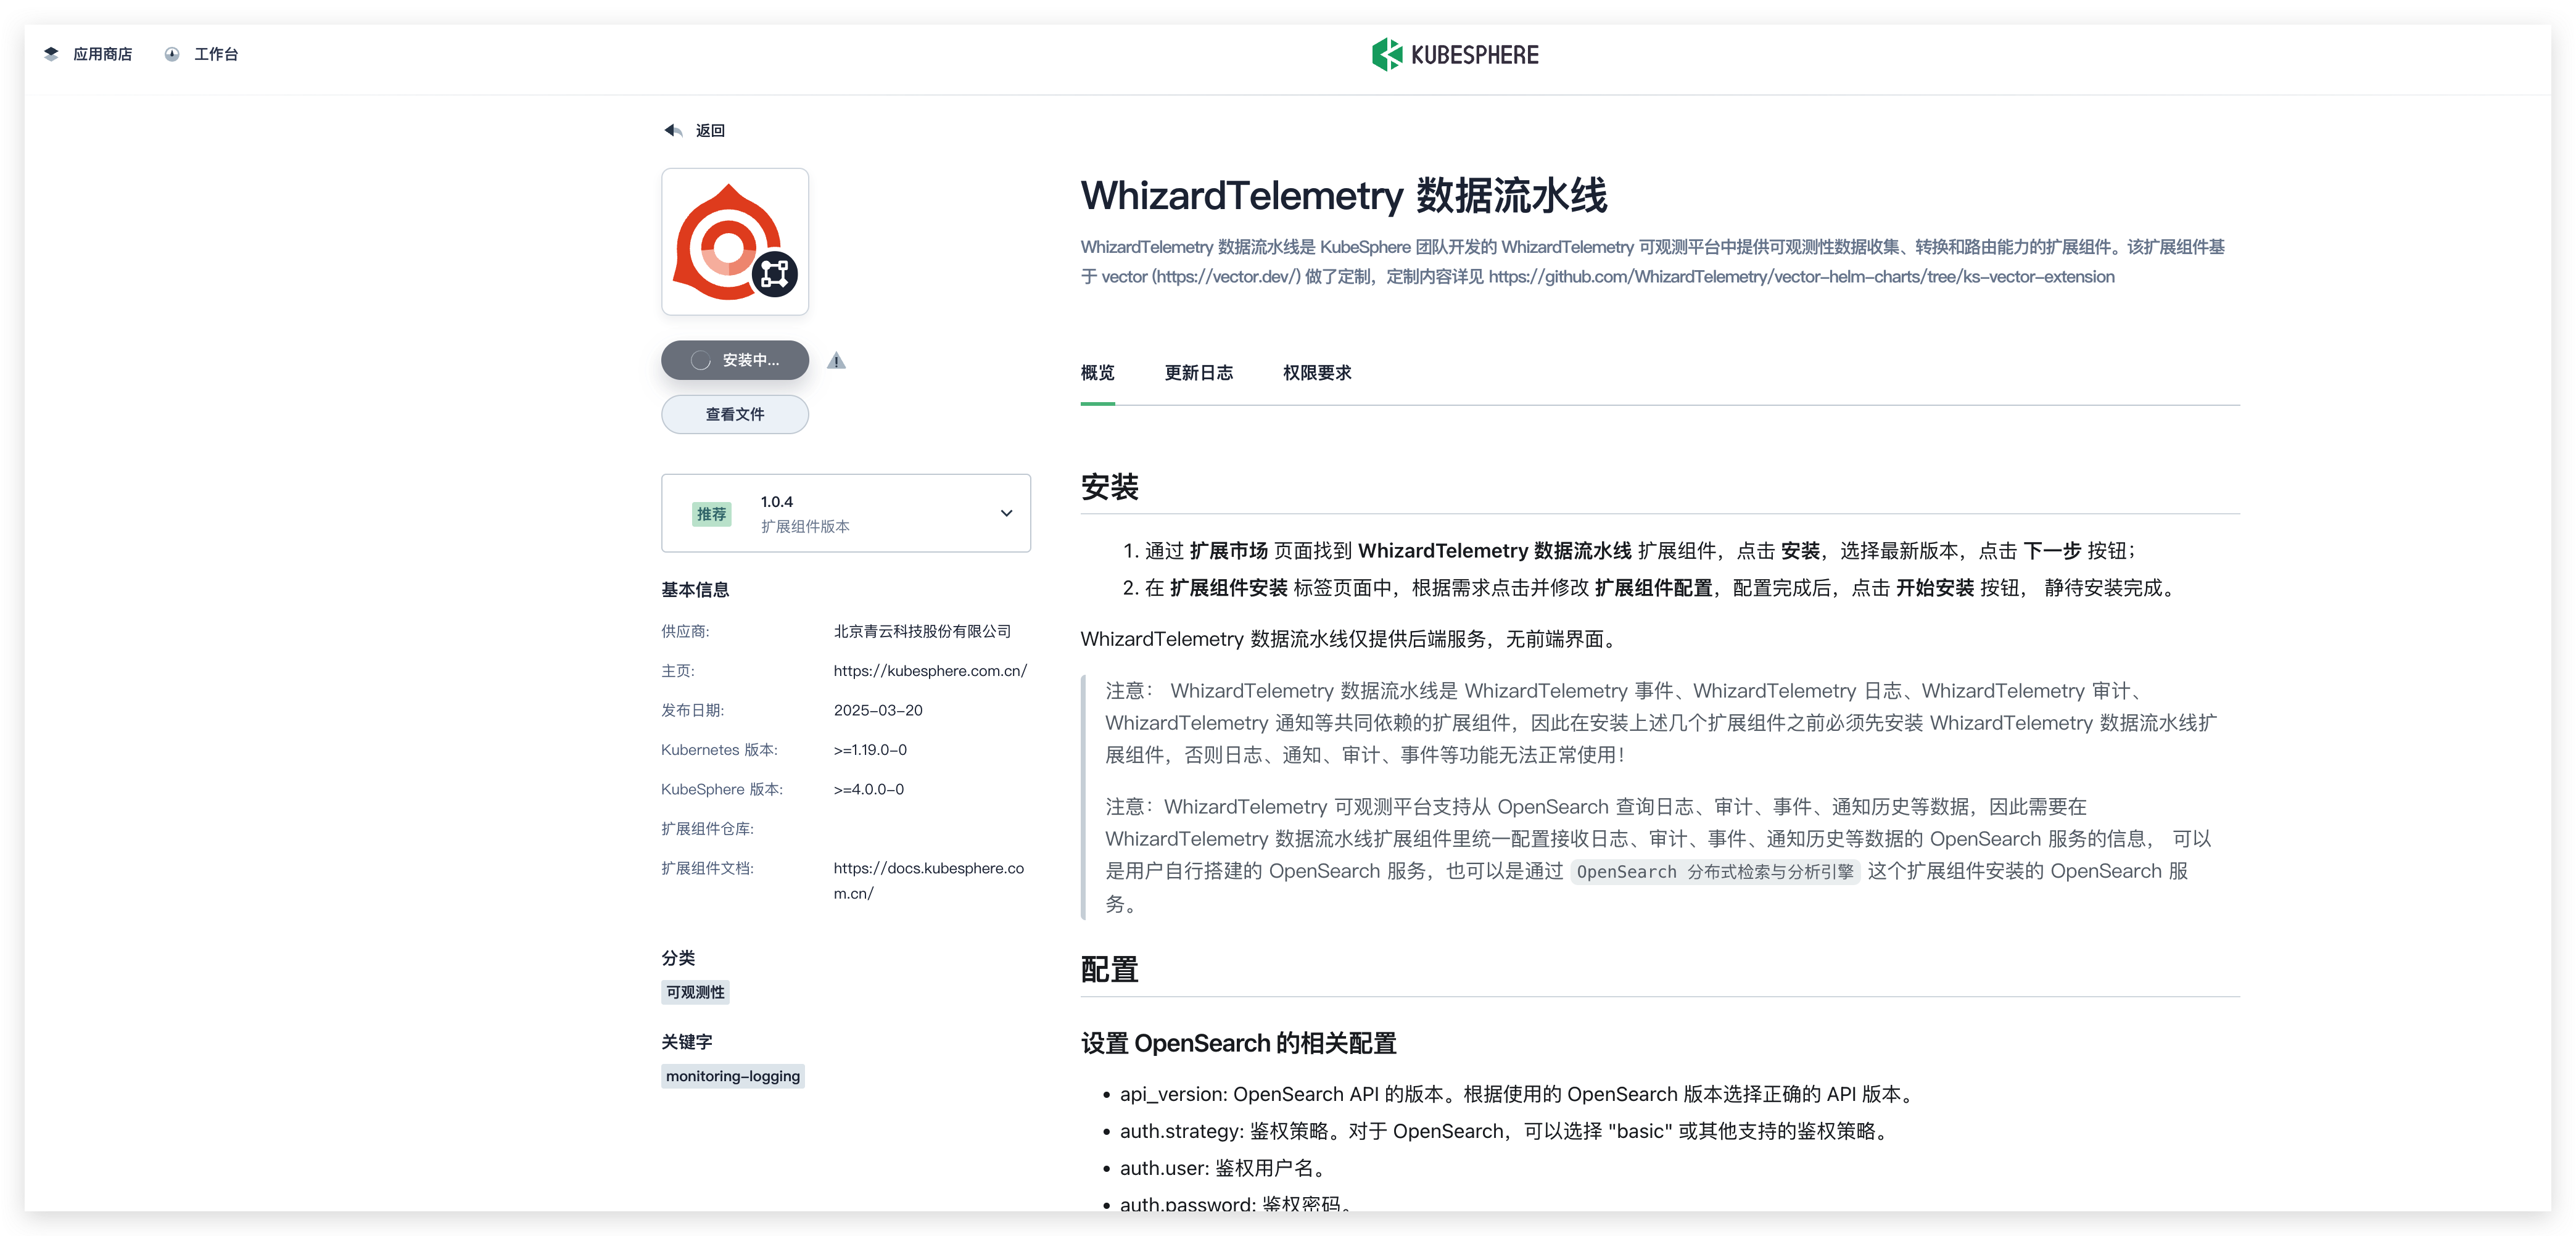
小kK零SQ: KubeSphere V4.1.2 扩展市场安装后,插件状态停留在“安装中”无法结束的问题如何解决?
A: 同步服务器时间后,重新执行安装任务,问题得到解决。之前的问题是由于节点时间不同步导致的。
bluespecter 您好,我也是同样地情况,请问如何执行重新安装?
状态还停留在“安装中”,怎么结束回到未安装的状态
DoNotBugPlz 嗯,已经知道了kubectl get installplan -A ……谢谢
@DoNotBugPlz 数据流水线的是vector
检查一下服务器时钟
确实和时间有关,如果同步时间后还是有问题的话,可以通过命令kubectl edit installplans.kubesphere.io <extensionName>把status块的几个时间手动修改成比helm release 的 UPDATED时间更早一些