- 已编辑
berr jesserwen
因为三个kk处理逻辑导致了该问题。- kk会在当前程序执行目录下生成一个./kubekey工作目录用于存放中途产生的文件,如kk自签名的证书等,这些文件会在之后传输至其他节点。
- kk使用sftp进行不同节点间传输文件,因为权限问题需要首先将文件传输至目标节点的/tmp/kubekey目录下,再通过sudo cp命令拷贝至相应的目录,并且每次传输文件的任务执行完成后会清空/tmp/kubekey目录。
- kk为了将all-in-one集群的处理和多节点保持一致降低复杂性,所以是通过ssh、sftp等方式连接当前节点执行操作。
因此,将kk放在/tmp目录下执行,会导致工作目录和用于传输文件的临时目录冲突,导致误删文件。
SsubendongK零S
hongming 亲测有效。
kubectl patch users admin -p ‘{“spec”:{“password”:“xxxxxxxx”}}’ –type=‘merge’ && kubectl annotate users admin iam.kubesphere.io/password-encrypted-
github issue :kubesphere/console#2746
是的哈哈尝试各种方法打通服务器和 Github 网络问题,终于搞定了。感谢大佬的启发!
Jjusda_hmK零S
johnniang 已提交issues
kubesphere/ks-devops#368peng 参考 https://kubesphere.io/zh/docs/devops-user-guide/examples/a-maven-project/
的文档问题得到了解决。不过shell命令的执行需要在容器里。
 freemankevinK零S
…好像系统自己检查出来后标黄几秒后就自己修复了,不过好像隔了半个钟之久
但是看代码质量结果确实成功了。使用的是admin的token


结贴,已解决,分享解决方式,以便之后朋友遇到此问题快速解决
只在master上执行就ok
移动到/tmp备份
cp -r /etc/kubernetes/ssl /home/bak
新生成配置
cd /etc/kubernetes/
mv {admin.conf,controller-manager.conf,kubelet.conf,scheduler.conf} /home/bak
kubeadm init phase kubeconfig all –config /etc/kubernetes/kubeadm-config.yaml
结果:
[kubeconfig] Using kubeconfig folder “/etc/kubernetes”
[kubeconfig] Writing “admin.conf” kubeconfig file
[kubeconfig] Writing “kubelet.conf” kubeconfig file
[kubeconfig] Writing “controller-manager.conf” kubeconfig file
[kubeconfig] Writing “scheduler.conf” kubeconfig file放置默认配置文件,否则kubectl执行会异常
cp -i /etc/kubernetes/admin.conf $HOME/.kube/config
重启机器
init 6
 RickK零S
从现象上来看,你的 Jenkins 的数据丢失。可能的方案包括:
数据恢复
如果你有备份的话,恢复 Jenkins 的数据应该可以解决这个问题
还有一种办法,你可以试着去修改每一个 Pipeline 的数据,修改完后 DevOps 会把流水线在 Jenkins 上做重建。如果没有重建的话,请查阅
ks-controller-manager的相关日志来进一步排查。清理丢失的数据
如果没有数据备份,而且这个环境清理数据也没问题的话。这时候,你可以把所有的 CR Pipeline 删除掉。
已解决,手动删除有问题的pvc,再创建个volume大小为20G的PVC即可。
 willqyK零S
- 已编辑
前言
kubekey已经发布了v1.2.0的alpha版本,该版本能够支持高可用k8s集群部署,虽然不是正式版,但是K粉已经迫不及待地尝鲜了一把。
kubekey通过在所有worker节点部署haproxy pod实现本地负载均衡机制,与kubespray及sealer等部署工具类似。

kubekey简介
kubeykey是KubeSphere基于Go 语言开发的kubernetes集群部署工具,使用 KubeKey,您可以轻松、高效、灵活地单独或整体安装 Kubernetes 和 KubeSphere。
有三种情况可以使用 KubeKey。
- 仅安装 Kubernetes
- 使用一个命令安装 Kubernetes 和 KubeSphere
- 首先安装 Kubernetes,然后使用ks-installer 在其上部署 KubeSphere

项目地址:https://github.com/kubesphere/kubekey
安装kubekey
kubekey下载地址:https://github.com/kubesphere/kubekey/releases
下载测试版kubekey-v1.2.0-alpha.2
wget https://github.com/kubesphere/kubekey/releases/download/v1.2.0-alpha.2/kubekey-v1.2.0-alpha.2-linux-amd64.tar.gz tar -zxvf kubekey-v1.2.0-alpha.2-linux-amd64.tar.gz mv kk /usr/local/bin/查看kubekey版本
kk version所有节点安装依赖(kubesphere要求及推荐的依赖包)
yum install -y socat conntrack ebtables ipset所有节点关闭selinux和firewalld
setenforce 0 && sed -i 's/^SELINUX=enforcing$/SELINUX=disabled/' /etc/selinux/config systemctl disable --now firewalld所有节点时间同步
yum install -y chrony systemctl enable --now chronyd timedatectl set-timezone Asia/Shanghai节点无需配置主机名,kubekey会自动纠正主机名。
部署all-in-one单节点
部署kubernetes单节点
kk create cluster同时部署kubernetes和kubesphere,可指定kubernetes版本或kubesphere版本
kk create cluster --with-kubernetes v1.20.4 --with-kubesphere v3.1.0部署多节点集群
准备6个节点,CentOS7.8 2C4G配置,部署3master、3node kubernetes v1.20.6高可用集群,以下所有操作在第一个节点执行:
当前目录创建示例配置文件
kk create config根据您的环境修改配置文件 config-sample.yaml,以下示例以部署3个master节点和3个node节点为例(不执行kubesphere部署,仅搭建kubernetes集群):
cat > config-sample.yaml <<EOF apiVersion: kubekey.kubesphere.io/v1alpha1 kind: Cluster metadata: name: sample spec: hosts: - {name: k8s-master1, address: 192.168.93.60, internalAddress: 192.168.93.60,user: root, password: 123456} - {name: k8s-master2, address: 192.168.93.61, internalAddress: 192.168.93.61,user: root, password: 123456} - {name: k8s-master3, address: 192.168.93.62, internalAddress: 192.168.93.62,user: root, password: 123456} - {name: k8s-node1, address: 192.168.93.63, internalAddress: 192.168.93.63,user: root, password: 123456} - {name: k8s-node2, address: 192.168.93.64, internalAddress: 192.168.93.64,user: root, password: 123456} - {name: k8s-node3, address: 192.168.93.65, internalAddress: 192.168.93.65,user: root, password: 123456} roleGroups: etcd: - k8s-master[1:3] master: - k8s-master[1:3] worker: - k8s-node[1:3] controlPlaneEndpoint: ##Internal loadbalancer for apiservers internalLoadbalancer: haproxy domain: lb.kubesphere.local address: "" # The IP address of your load balancer. port: 6443 kubernetes: version: v1.20.6 imageRepo: kubesphere clusterName: cluster.local network: plugin: calico kubePodsCIDR: 10.233.64.0/18 kubeServiceCIDR: 10.233.0.0/18 registry: registryMirrors: [] insecureRegistries: [] addons: [] EOF使用配置文件创建集群
export KKZONE=cn kk create cluster -f config-sample.yaml | tee kk.log创建完成后查看节点状态,3个master运行正常
[root@k8s-master1 ~]# kubectl get nodes -o wide NAME STATUS ROLES AGE VERSION INTERNAL-IP EXTERNAL-IP OS-IMAGE KERNEL-VERSION CONTAINER-RUNTIME k8s-master1 Ready control-plane,master 4m58s v1.20.6 192.168.93.60 <none> CentOS Linux 7 (Core) 3.10.0-1127.el7.x86_64 docker://20.10.7 k8s-master2 Ready control-plane,master 3m58s v1.20.6 192.168.93.61 <none> CentOS Linux 7 (Core) 3.10.0-1127.el7.x86_64 docker://20.10.7 k8s-master3 Ready control-plane,master 3m58s v1.20.6 192.168.93.62 <none> CentOS Linux 7 (Core) 3.10.0-1127.el7.x86_64 docker://20.10.7 k8s-node1 Ready worker 4m13s v1.20.6 192.168.93.63 <none> CentOS Linux 7 (Core) 3.10.0-1127.el7.x86_64 docker://20.10.7 k8s-node2 Ready worker 3m59s v1.20.6 192.168.93.64 <none> CentOS Linux 7 (Core) 3.10.0-1127.el7.x86_64 docker://20.10.7 k8s-node3 Ready worker 3m59s v1.20.6 192.168.93.65 <none> CentOS Linux 7 (Core) 3.10.0-1127.el7.x86_64 docker://20.10.7查看所有pod状态,3个node都运行一个haproy pod,node节点组件与master通信时负载到kube-apiserver:
[root@k8s-master1 ~]# kubectl get pods -A NAMESPACE NAME READY STATUS RESTARTS AGE kube-system calico-kube-controllers-8545b68dd4-rbshc 1/1 Running 2 3m48s kube-system calico-node-5k7b5 1/1 Running 1 3m48s kube-system calico-node-6cv8z 1/1 Running 1 3m48s kube-system calico-node-8rbjs 1/1 Running 0 3m48s kube-system calico-node-d6wkc 1/1 Running 0 3m48s kube-system calico-node-q8qp8 1/1 Running 0 3m48s kube-system calico-node-rvqpj 1/1 Running 0 3m48s kube-system coredns-7f87749d6c-66wqb 1/1 Running 0 4m58s kube-system coredns-7f87749d6c-htqww 1/1 Running 0 4m58s kube-system haproxy-k8s-node1 1/1 Running 0 4m3s kube-system haproxy-k8s-node2 1/1 Running 0 4m3s kube-system haproxy-k8s-node3 1/1 Running 0 2m47s kube-system kube-apiserver-k8s-master1 1/1 Running 0 5m13s kube-system kube-apiserver-k8s-master2 1/1 Running 0 4m10s kube-system kube-apiserver-k8s-master3 1/1 Running 0 4m16s kube-system kube-controller-manager-k8s-master1 1/1 Running 0 5m13s kube-system kube-controller-manager-k8s-master2 1/1 Running 0 4m10s kube-system kube-controller-manager-k8s-master3 1/1 Running 0 4m16s kube-system kube-proxy-2t5l6 1/1 Running 0 3m55s kube-system kube-proxy-b8q6g 1/1 Running 0 3m56s kube-system kube-proxy-dsz5g 1/1 Running 0 3m55s kube-system kube-proxy-g2gxz 1/1 Running 0 3m55s kube-system kube-proxy-p6gb7 1/1 Running 0 3m57s kube-system kube-proxy-q44jp 1/1 Running 0 3m56s kube-system kube-scheduler-k8s-master1 1/1 Running 0 5m13s kube-system kube-scheduler-k8s-master2 1/1 Running 0 4m10s kube-system kube-scheduler-k8s-master3 1/1 Running 0 4m16s kube-system nodelocaldns-l958t 1/1 Running 0 4m19s kube-system nodelocaldns-n7vkn 1/1 Running 0 4m18s kube-system nodelocaldns-q6wjc 1/1 Running 0 4m33s kube-system nodelocaldns-sfmcc 1/1 Running 0 4m58s kube-system nodelocaldns-tvdbh 1/1 Running 0 4m18s kube-system nodelocaldns-vg5t7 1/1 Running 0 4m19s3个node节点的haproxy以static pod方式部署,使用hostNetwork模式
[root@k8s-node1 ~]# cat /etc/kubernetes/manifests/haproxy.yaml apiVersion: v1 kind: Pod metadata: name: haproxy namespace: kube-system labels: addonmanager.kubernetes.io/mode: Reconcile k8s-app: kube-haproxy annotations: cfg-checksum: "4fa7a0eadadb692da91d941237ce4f0c" spec: hostNetwork: true dnsPolicy: ClusterFirstWithHostNet nodeSelector: kubernetes.io/os: linux priorityClassName: system-node-critical containers: - name: haproxy image: registry.cn-beijing.aliyuncs.com/kubesphereio/haproxy:2.3 imagePullPolicy: Always resources: requests: cpu: 25m memory: 32M livenessProbe: httpGet: path: /healthz port: 8081 readinessProbe: httpGet: path: /healthz port: 8081 volumeMounts: - mountPath: /usr/local/etc/haproxy/ name: etc-haproxy readOnly: true volumes: - name: etc-haproxy hostPath: path: /etc/kubekey/haproxy查看haproxy配置文件,在node节点访问127.0.0.1:6443将负载均衡到后端3个master节点6443端口:
[root@k8s-node1 ~]# cat /etc/kubekey/haproxy/haproxy.cfg global maxconn 4000 log 127.0.0.1 local0 defaults mode http log global option httplog option dontlognull option http-server-close option redispatch retries 5 timeout http-request 5m timeout queue 5m timeout connect 30s timeout client 30s timeout server 15m timeout http-keep-alive 30s timeout check 30s maxconn 4000 frontend healthz bind *:8081 mode http monitor-uri /healthz frontend kube_api_frontend bind 127.0.0.1:6443 mode tcp option tcplog default_backend kube_api_backend backend kube_api_backend mode tcp balance leastconn default-server inter 15s downinter 15s rise 2 fall 2 slowstart 60s maxconn 1000 maxqueue 256 weight 100 option httpchk GET /healthz http-check expect status 200 server k8s-master1 192.168.93.60:6443 check check-ssl verify none server k8s-master2 192.168.93.61:6443 check check-ssl verify none server k8s-master3 192.168.93.62:6443 check check-ssl verify none整个部署过程很丝滑,完整日志如下,有助于了解命令执行过程中执行了哪些操作:
[root@k8s-master1 ~]# cat kk.log +-------------+------+------+---------+----------+-------+-------+-----------+---------+------------+-------------+------------------+--------------+ | name | sudo | curl | openssl | ebtables | socat | ipset | conntrack | docker | nfs client | ceph client | glusterfs client | time | +-------------+------+------+---------+----------+-------+-------+-----------+---------+------------+-------------+------------------+--------------+ | k8s-master2 | y | y | y | y | y | y | y | 20.10.7 | | | | CST 12:50:29 | | k8s-node1 | y | y | y | y | y | y | y | 20.10.7 | | | | CST 12:50:29 | | k8s-node2 | y | y | y | y | y | y | y | 20.10.7 | | | | CST 12:50:29 | | k8s-node3 | y | y | y | y | y | y | y | 20.10.7 | | | | CST 12:50:29 | | k8s-master3 | y | y | y | y | y | y | y | 20.10.7 | | | | CST 12:50:29 | | k8s-master1 | y | y | y | y | y | y | y | 20.10.7 | | | | CST 12:50:29 | +-------------+------+------+---------+----------+-------+-------+-----------+---------+------------+-------------+------------------+--------------+ This is a simple check of your environment. Before installation, you should ensure that your machines meet all requirements specified at https://github.com/kubesphere/kubekey#requirements-and-recommendations Continue this installation? [yes/no]: [k8s-node1 192.168.93.63] MSG: net.ipv4.ip_forward = 1 net.bridge.bridge-nf-call-arptables = 1 net.bridge.bridge-nf-call-ip6tables = 1 net.bridge.bridge-nf-call-iptables = 1 net.ipv4.ip_local_reserved_ports = 30000-32767 vm.max_map_count = 262144 vm.swappiness = 1 fs.inotify.max_user_instances = 524288 [k8s-node3 192.168.93.65] MSG: net.ipv4.ip_forward = 1 net.bridge.bridge-nf-call-arptables = 1 net.bridge.bridge-nf-call-ip6tables = 1 net.bridge.bridge-nf-call-iptables = 1 net.ipv4.ip_local_reserved_ports = 30000-32767 vm.max_map_count = 262144 vm.swappiness = 1 fs.inotify.max_user_instances = 524288 [k8s-master2 192.168.93.61] MSG: net.ipv4.ip_forward = 1 net.bridge.bridge-nf-call-arptables = 1 net.bridge.bridge-nf-call-ip6tables = 1 net.bridge.bridge-nf-call-iptables = 1 net.ipv4.ip_local_reserved_ports = 30000-32767 vm.max_map_count = 262144 vm.swappiness = 1 fs.inotify.max_user_instances = 524288 [k8s-node2 192.168.93.64] MSG: net.ipv4.ip_forward = 1 net.bridge.bridge-nf-call-arptables = 1 net.bridge.bridge-nf-call-ip6tables = 1 net.bridge.bridge-nf-call-iptables = 1 net.ipv4.ip_local_reserved_ports = 30000-32767 vm.max_map_count = 262144 vm.swappiness = 1 fs.inotify.max_user_instances = 524288 [k8s-master3 192.168.93.62] MSG: net.ipv4.ip_forward = 1 net.bridge.bridge-nf-call-arptables = 1 net.bridge.bridge-nf-call-ip6tables = 1 net.bridge.bridge-nf-call-iptables = 1 net.ipv4.ip_local_reserved_ports = 30000-32767 vm.max_map_count = 262144 vm.swappiness = 1 fs.inotify.max_user_instances = 524288 [k8s-master1 192.168.93.60] MSG: net.ipv4.ip_forward = 1 net.bridge.bridge-nf-call-arptables = 1 net.bridge.bridge-nf-call-ip6tables = 1 net.bridge.bridge-nf-call-iptables = 1 net.ipv4.ip_local_reserved_ports = 30000-32767 vm.max_map_count = 262144 vm.swappiness = 1 fs.inotify.max_user_instances = 524288 [k8s-node3] Downloading image: registry.cn-beijing.aliyuncs.com/kubesphereio/pause:3.2 [k8s-master3] Downloading image: registry.cn-beijing.aliyuncs.com/kubesphereio/etcd:v3.4.13 [k8s-master1] Downloading image: registry.cn-beijing.aliyuncs.com/kubesphereio/etcd:v3.4.13 [k8s-master2] Downloading image: registry.cn-beijing.aliyuncs.com/kubesphereio/etcd:v3.4.13 [k8s-node1] Downloading image: registry.cn-beijing.aliyuncs.com/kubesphereio/pause:3.2 [k8s-node2] Downloading image: registry.cn-beijing.aliyuncs.com/kubesphereio/pause:3.2 [k8s-master3] Downloading image: registry.cn-beijing.aliyuncs.com/kubesphereio/pause:3.2 [k8s-master1] Downloading image: registry.cn-beijing.aliyuncs.com/kubesphereio/pause:3.2 [k8s-master2] Downloading image: registry.cn-beijing.aliyuncs.com/kubesphereio/pause:3.2 [k8s-node1] Downloading image: registry.cn-beijing.aliyuncs.com/kubesphereio/kube-proxy:v1.20.6 [k8s-node2] Downloading image: registry.cn-beijing.aliyuncs.com/kubesphereio/kube-proxy:v1.20.6 [k8s-master3] Downloading image: registry.cn-beijing.aliyuncs.com/kubesphereio/kube-apiserver:v1.20.6 [k8s-master2] Downloading image: registry.cn-beijing.aliyuncs.com/kubesphereio/kube-apiserver:v1.20.6 [k8s-master1] Downloading image: registry.cn-beijing.aliyuncs.com/kubesphereio/kube-apiserver:v1.20.6 [k8s-node2] Downloading image: registry.cn-beijing.aliyuncs.com/kubesphereio/coredns:1.6.9 [k8s-node1] Downloading image: registry.cn-beijing.aliyuncs.com/kubesphereio/coredns:1.6.9 [k8s-node2] Downloading image: registry.cn-beijing.aliyuncs.com/kubesphereio/k8s-dns-node-cache:1.15.12 [k8s-master3] Downloading image: registry.cn-beijing.aliyuncs.com/kubesphereio/kube-controller-manager:v1.20.6 [k8s-master2] Downloading image: registry.cn-beijing.aliyuncs.com/kubesphereio/kube-controller-manager:v1.20.6 [k8s-node1] Downloading image: registry.cn-beijing.aliyuncs.com/kubesphereio/k8s-dns-node-cache:1.15.12 [k8s-master1] Downloading image: registry.cn-beijing.aliyuncs.com/kubesphereio/kube-controller-manager:v1.20.6 [k8s-node2] Downloading image: registry.cn-beijing.aliyuncs.com/kubesphereio/kube-controllers:v3.16.3 [k8s-master2] Downloading image: registry.cn-beijing.aliyuncs.com/kubesphereio/kube-scheduler:v1.20.6 [k8s-master1] Downloading image: registry.cn-beijing.aliyuncs.com/kubesphereio/kube-scheduler:v1.20.6 [k8s-node1] Downloading image: registry.cn-beijing.aliyuncs.com/kubesphereio/kube-controllers:v3.16.3 [k8s-node2] Downloading image: registry.cn-beijing.aliyuncs.com/kubesphereio/cni:v3.16.3 [k8s-master2] Downloading image: registry.cn-beijing.aliyuncs.com/kubesphereio/kube-proxy:v1.20.6 [k8s-node1] Downloading image: registry.cn-beijing.aliyuncs.com/kubesphereio/cni:v3.16.3 [k8s-master1] Downloading image: registry.cn-beijing.aliyuncs.com/kubesphereio/kube-proxy:v1.20.6 [k8s-node2] Downloading image: registry.cn-beijing.aliyuncs.com/kubesphereio/node:v3.16.3 [k8s-master1] Downloading image: registry.cn-beijing.aliyuncs.com/kubesphereio/coredns:1.6.9 [k8s-master2] Downloading image: registry.cn-beijing.aliyuncs.com/kubesphereio/coredns:1.6.9 [k8s-node1] Downloading image: registry.cn-beijing.aliyuncs.com/kubesphereio/node:v3.16.3 [k8s-node2] Downloading image: registry.cn-beijing.aliyuncs.com/kubesphereio/pod2daemon-flexvol:v3.16.3 [k8s-master1] Downloading image: registry.cn-beijing.aliyuncs.com/kubesphereio/k8s-dns-node-cache:1.15.12 [k8s-master2] Downloading image: registry.cn-beijing.aliyuncs.com/kubesphereio/k8s-dns-node-cache:1.15.12 [k8s-node3] Downloading image: registry.cn-beijing.aliyuncs.com/kubesphereio/kube-proxy:v1.20.6 [k8s-node1] Downloading image: registry.cn-beijing.aliyuncs.com/kubesphereio/pod2daemon-flexvol:v3.16.3 [k8s-node2] Downloading image: registry.cn-beijing.aliyuncs.com/kubesphereio/haproxy:2.3 [k8s-master1] Downloading image: registry.cn-beijing.aliyuncs.com/kubesphereio/kube-controllers:v3.16.3 [k8s-master2] Downloading image: registry.cn-beijing.aliyuncs.com/kubesphereio/kube-controllers:v3.16.3 [k8s-node3] Downloading image: registry.cn-beijing.aliyuncs.com/kubesphereio/coredns:1.6.9 [k8s-node1] Downloading image: registry.cn-beijing.aliyuncs.com/kubesphereio/haproxy:2.3 [k8s-master1] Downloading image: registry.cn-beijing.aliyuncs.com/kubesphereio/cni:v3.16.3 [k8s-master2] Downloading image: registry.cn-beijing.aliyuncs.com/kubesphereio/cni:v3.16.3 [k8s-node3] Downloading image: registry.cn-beijing.aliyuncs.com/kubesphereio/k8s-dns-node-cache:1.15.12 [k8s-master2] Downloading image: registry.cn-beijing.aliyuncs.com/kubesphereio/node:v3.16.3 [k8s-master1] Downloading image: registry.cn-beijing.aliyuncs.com/kubesphereio/node:v3.16.3 [k8s-node3] Downloading image: registry.cn-beijing.aliyuncs.com/kubesphereio/kube-controllers:v3.16.3 [k8s-master2] Downloading image: registry.cn-beijing.aliyuncs.com/kubesphereio/pod2daemon-flexvol:v3.16.3 [k8s-master1] Downloading image: registry.cn-beijing.aliyuncs.com/kubesphereio/pod2daemon-flexvol:v3.16.3 [k8s-node3] Downloading image: registry.cn-beijing.aliyuncs.com/kubesphereio/cni:v3.16.3 [k8s-node3] Downloading image: registry.cn-beijing.aliyuncs.com/kubesphereio/node:v3.16.3 [k8s-node3] Downloading image: registry.cn-beijing.aliyuncs.com/kubesphereio/pod2daemon-flexvol:v3.16.3 [k8s-node3] Downloading image: registry.cn-beijing.aliyuncs.com/kubesphereio/haproxy:2.3 [k8s-master3] Downloading image: registry.cn-beijing.aliyuncs.com/kubesphereio/kube-scheduler:v1.20.6 [k8s-master3] Downloading image: registry.cn-beijing.aliyuncs.com/kubesphereio/kube-proxy:v1.20.6 [k8s-master3] Downloading image: registry.cn-beijing.aliyuncs.com/kubesphereio/coredns:1.6.9 [k8s-master3] Downloading image: registry.cn-beijing.aliyuncs.com/kubesphereio/k8s-dns-node-cache:1.15.12 [k8s-master3] Downloading image: registry.cn-beijing.aliyuncs.com/kubesphereio/kube-controllers:v3.16.3 [k8s-master3] Downloading image: registry.cn-beijing.aliyuncs.com/kubesphereio/cni:v3.16.3 [k8s-master3] Downloading image: registry.cn-beijing.aliyuncs.com/kubesphereio/node:v3.16.3 [k8s-master3] Downloading image: registry.cn-beijing.aliyuncs.com/kubesphereio/pod2daemon-flexvol:v3.16.3 [k8s-master1 192.168.93.60] MSG: Configuration file will be created [k8s-master2 192.168.93.61] MSG: Configuration file will be created [k8s-master3 192.168.93.62] MSG: Configuration file will be created [k8s-master2 192.168.93.61] MSG: etcd will be installed [k8s-master1 192.168.93.60] MSG: etcd will be installed [k8s-master3 192.168.93.62] MSG: etcd will be installed [k8s-master3 192.168.93.62] MSG: Created symlink from /etc/systemd/system/multi-user.target.wants/etcd.service to /etc/systemd/system/etcd.service. [k8s-master2 192.168.93.61] MSG: Created symlink from /etc/systemd/system/multi-user.target.wants/etcd.service to /etc/systemd/system/etcd.service. Waiting for etcd to start [k8s-master1 192.168.93.60] MSG: Created symlink from /etc/systemd/system/multi-user.target.wants/etcd.service to /etc/systemd/system/etcd.service. Waiting for etcd to start Waiting for etcd to start [k8s-master1 192.168.93.60] MSG: Cluster will be created. [k8s-master2 192.168.93.61] MSG: Cluster will be created. [k8s-master3 192.168.93.62] MSG: Cluster will be created. Push /root/kubekey/v1.20.6/amd64/kubeadm to 192.168.93.60:/tmp/kubekey/kubeadm Done Push /root/kubekey/v1.20.6/amd64/kubeadm to 192.168.93.63:/tmp/kubekey/kubeadm Done Push /root/kubekey/v1.20.6/amd64/kubeadm to 192.168.93.65:/tmp/kubekey/kubeadm Done Push /root/kubekey/v1.20.6/amd64/kubeadm to 192.168.93.64:/tmp/kubekey/kubeadm Done Push /root/kubekey/v1.20.6/amd64/kubeadm to 192.168.93.61:/tmp/kubekey/kubeadm Done Push /root/kubekey/v1.20.6/amd64/kubeadm to 192.168.93.62:/tmp/kubekey/kubeadm Done Push /root/kubekey/v1.20.6/amd64/kubelet to 192.168.93.65:/tmp/kubekey/kubelet Done Push /root/kubekey/v1.20.6/amd64/kubelet to 192.168.93.64:/tmp/kubekey/kubelet Done Push /root/kubekey/v1.20.6/amd64/kubelet to 192.168.93.63:/tmp/kubekey/kubelet Done Push /root/kubekey/v1.20.6/amd64/kubelet to 192.168.93.61:/tmp/kubekey/kubelet Done Push /root/kubekey/v1.20.6/amd64/kubelet to 192.168.93.60:/tmp/kubekey/kubelet Done Push /root/kubekey/v1.20.6/amd64/kubectl to 192.168.93.65:/tmp/kubekey/kubectl Done Push /root/kubekey/v1.20.6/amd64/kubectl to 192.168.93.63:/tmp/kubekey/kubectl Done Push /root/kubekey/v1.20.6/amd64/kubectl to 192.168.93.64:/tmp/kubekey/kubectl Done Push /root/kubekey/v1.20.6/amd64/kubectl to 192.168.93.61:/tmp/kubekey/kubectl Done Push /root/kubekey/v1.20.6/amd64/kubectl to 192.168.93.60:/tmp/kubekey/kubectl Done Push /root/kubekey/v1.20.6/amd64/helm to 192.168.93.63:/tmp/kubekey/helm Done Push /root/kubekey/v1.20.6/amd64/helm to 192.168.93.64:/tmp/kubekey/helm Done Push /root/kubekey/v1.20.6/amd64/helm to 192.168.93.65:/tmp/kubekey/helm Done Push /root/kubekey/v1.20.6/amd64/helm to 192.168.93.61:/tmp/kubekey/helm Done Push /root/kubekey/v1.20.6/amd64/helm to 192.168.93.60:/tmp/kubekey/helm Done Push /root/kubekey/v1.20.6/amd64/cni-plugins-linux-amd64-v0.8.6.tgz to 192.168.93.65:/tmp/kubekey/cni-plugins-linux-amd64-v0.8.6.tgz Done Push /root/kubekey/v1.20.6/amd64/cni-plugins-linux-amd64-v0.8.6.tgz to 192.168.93.64:/tmp/kubekey/cni-plugins-linux-amd64-v0.8.6.tgz Done Push /root/kubekey/v1.20.6/amd64/cni-plugins-linux-amd64-v0.8.6.tgz to 192.168.93.63:/tmp/kubekey/cni-plugins-linux-amd64-v0.8.6.tgz Done Push /root/kubekey/v1.20.6/amd64/cni-plugins-linux-amd64-v0.8.6.tgz to 192.168.93.60:/tmp/kubekey/cni-plugins-linux-amd64-v0.8.6.tgz Done Push /root/kubekey/v1.20.6/amd64/cni-plugins-linux-amd64-v0.8.6.tgz to 192.168.93.61:/tmp/kubekey/cni-plugins-linux-amd64-v0.8.6.tgz Done Push /root/kubekey/v1.20.6/amd64/kubelet to 192.168.93.62:/tmp/kubekey/kubelet Done Push /root/kubekey/v1.20.6/amd64/kubectl to 192.168.93.62:/tmp/kubekey/kubectl Done Push /root/kubekey/v1.20.6/amd64/helm to 192.168.93.62:/tmp/kubekey/helm Done Push /root/kubekey/v1.20.6/amd64/cni-plugins-linux-amd64-v0.8.6.tgz to 192.168.93.62:/tmp/kubekey/cni-plugins-linux-amd64-v0.8.6.tgz Done [k8s-master1 192.168.93.60] MSG: W0729 12:53:36.913976 9108 utils.go:69] The recommended value for "clusterDNS" in "KubeletConfiguration" is: [10.233.0.10]; the provided value is: [169.254.25.10] [init] Using Kubernetes version: v1.20.6 [preflight] Running pre-flight checks [WARNING SystemVerification]: this Docker version is not on the list of validated versions: 20.10.7. Latest validated version: 19.03 [preflight] Pulling images required for setting up a Kubernetes cluster [preflight] This might take a minute or two, depending on the speed of your internet connection [preflight] You can also perform this action in beforehand using 'kubeadm config images pull' [certs] Using certificateDir folder "/etc/kubernetes/pki" [certs] Generating "ca" certificate and key [certs] Generating "apiserver" certificate and key [certs] apiserver serving cert is signed for DNS names [k8s-master1 k8s-master1.cluster.local k8s-master2 k8s-master2.cluster.local k8s-master3 k8s-master3.cluster.local k8s-node1 k8s-node1.cluster.local k8s-node2 k8s-node2.cluster.local k8s-node3 k8s-node3.cluster.local kubernetes kubernetes.default kubernetes.default.svc kubernetes.default.svc.cluster.local lb.kubesphere.local localhost] and IPs [10.233.0.1 192.168.93.60 127.0.0.1 192.168.93.61 192.168.93.62 192.168.93.63 192.168.93.64 192.168.93.65] [certs] Generating "apiserver-kubelet-client" certificate and key [certs] Generating "front-proxy-ca" certificate and key [certs] Generating "front-proxy-client" certificate and key [certs] External etcd mode: Skipping etcd/ca certificate authority generation [certs] External etcd mode: Skipping etcd/server certificate generation [certs] External etcd mode: Skipping etcd/peer certificate generation [certs] External etcd mode: Skipping etcd/healthcheck-client certificate generation [certs] External etcd mode: Skipping apiserver-etcd-client certificate generation [certs] Generating "sa" key and public key [kubeconfig] Using kubeconfig folder "/etc/kubernetes" [kubeconfig] Writing "admin.conf" kubeconfig file [kubeconfig] Writing "kubelet.conf" kubeconfig file [kubeconfig] Writing "controller-manager.conf" kubeconfig file [kubeconfig] Writing "scheduler.conf" kubeconfig file [kubelet-start] Writing kubelet environment file with flags to file "/var/lib/kubelet/kubeadm-flags.env" [kubelet-start] Writing kubelet configuration to file "/var/lib/kubelet/config.yaml" [kubelet-start] Starting the kubelet [control-plane] Using manifest folder "/etc/kubernetes/manifests" [control-plane] Creating static Pod manifest for "kube-apiserver" [control-plane] Creating static Pod manifest for "kube-controller-manager" [control-plane] Creating static Pod manifest for "kube-scheduler" [wait-control-plane] Waiting for the kubelet to boot up the control plane as static Pods from directory "/etc/kubernetes/manifests". This can take up to 4m0s [kubelet-check] Initial timeout of 40s passed. [apiclient] All control plane components are healthy after 51.506830 seconds [upload-config] Storing the configuration used in ConfigMap "kubeadm-config" in the "kube-system" Namespace [kubelet] Creating a ConfigMap "kubelet-config-1.20" in namespace kube-system with the configuration for the kubelets in the cluster [upload-certs] Skipping phase. Please see --upload-certs [mark-control-plane] Marking the node k8s-master1 as control-plane by adding the labels "node-role.kubernetes.io/master=''" and "node-role.kubernetes.io/control-plane='' (deprecated)" [mark-control-plane] Marking the node k8s-master1 as control-plane by adding the taints [node-role.kubernetes.io/master:NoSchedule] [bootstrap-token] Using token: d1u2p8.7dwt14rghk6zwcc5 [bootstrap-token] Configuring bootstrap tokens, cluster-info ConfigMap, RBAC Roles [bootstrap-token] configured RBAC rules to allow Node Bootstrap tokens to get nodes [bootstrap-token] configured RBAC rules to allow Node Bootstrap tokens to post CSRs in order for nodes to get long term certificate credentials [bootstrap-token] configured RBAC rules to allow the csrapprover controller automatically approve CSRs from a Node Bootstrap Token [bootstrap-token] configured RBAC rules to allow certificate rotation for all node client certificates in the cluster [bootstrap-token] Creating the "cluster-info" ConfigMap in the "kube-public" namespace [kubelet-finalize] Updating "/etc/kubernetes/kubelet.conf" to point to a rotatable kubelet client certificate and key [addons] Applied essential addon: CoreDNS [addons] Applied essential addon: kube-proxy Your Kubernetes control-plane has initialized successfully! To start using your cluster, you need to run the following as a regular user: mkdir -p $HOME/.kube sudo cp -i /etc/kubernetes/admin.conf $HOME/.kube/config sudo chown $(id -u):$(id -g) $HOME/.kube/config Alternatively, if you are the root user, you can run: export KUBECONFIG=/etc/kubernetes/admin.conf You should now deploy a pod network to the cluster. Run "kubectl apply -f [podnetwork].yaml" with one of the options listed at: https://kubernetes.io/docs/concepts/cluster-administration/addons/ You can now join any number of control-plane nodes by copying certificate authorities and service account keys on each node and then running the following as root: kubeadm join lb.kubesphere.local:6443 --token d1u2p8.7dwt14rghk6zwcc5 \ --discovery-token-ca-cert-hash sha256:61bc947886bc3596c37f0d8595e6fc1cc4bffa63a2cff55ad6d18301dad915f5 \ --control-plane Then you can join any number of worker nodes by running the following on each as root: kubeadm join lb.kubesphere.local:6443 --token d1u2p8.7dwt14rghk6zwcc5 \ --discovery-token-ca-cert-hash sha256:61bc947886bc3596c37f0d8595e6fc1cc4bffa63a2cff55ad6d18301dad915f5 [k8s-master1 192.168.93.60] MSG: service "kube-dns" deleted [k8s-master1 192.168.93.60] MSG: service/coredns created [k8s-master1 192.168.93.60] MSG: serviceaccount/nodelocaldns created daemonset.apps/nodelocaldns created [k8s-master1 192.168.93.60] MSG: configmap/nodelocaldns created [k8s-master1 192.168.93.60] MSG: I0729 12:55:03.680214 10836 version.go:254] remote version is much newer: v1.21.3; falling back to: stable-1.20 [upload-certs] Storing the certificates in Secret "kubeadm-certs" in the "kube-system" Namespace [upload-certs] Using certificate key: cdc67cacb3460d32a92d94548b67e4a7b5db5d29dad6304ebf0b2442dce02785 [k8s-master1 192.168.93.60] MSG: secret/kubeadm-certs patched [k8s-master1 192.168.93.60] MSG: secret/kubeadm-certs patched [k8s-master1 192.168.93.60] MSG: secret/kubeadm-certs patched [k8s-master1 192.168.93.60] MSG: kubeadm join lb.kubesphere.local:6443 --token h0hkd2.igsowb70b0h6kjs3 --discovery-token-ca-cert-hash sha256:61bc947886bc3596c37f0d8595e6fc1cc4bffa63a2cff55ad6d18301dad915f5 [k8s-master1 192.168.93.60] MSG: k8s-master1 v1.20.6 [map[address:192.168.93.60 type:InternalIP] map[address:k8s-master1 type:Hostname]] [k8s-node1 192.168.93.63] MSG: [preflight] Running pre-flight checks [WARNING SystemVerification]: this Docker version is not on the list of validated versions: 20.10.7. Latest validated version: 19.03 [preflight] Reading configuration from the cluster... [preflight] FYI: You can look at this config file with 'kubectl -n kube-system get cm kubeadm-config -o yaml' W0729 12:55:13.818109 7628 utils.go:69] The recommended value for "clusterDNS" in "KubeletConfiguration" is: [10.233.0.10]; the provided value is: [169.254.25.10] [kubelet-start] Writing kubelet configuration to file "/var/lib/kubelet/config.yaml" [kubelet-start] Writing kubelet environment file with flags to file "/var/lib/kubelet/kubeadm-flags.env" [kubelet-start] Starting the kubelet [kubelet-start] Waiting for the kubelet to perform the TLS Bootstrap... This node has joined the cluster: * Certificate signing request was sent to apiserver and a response was received. * The Kubelet was informed of the new secure connection details. Run 'kubectl get nodes' on the control-plane to see this node join the cluster. [k8s-node1 192.168.93.63] MSG: node/k8s-node1 labeled [k8s-node3 192.168.93.65] MSG: [preflight] Running pre-flight checks [WARNING SystemVerification]: this Docker version is not on the list of validated versions: 20.10.7. Latest validated version: 19.03 [preflight] Reading configuration from the cluster... [preflight] FYI: You can look at this config file with 'kubectl -n kube-system get cm kubeadm-config -o yaml' W0729 12:55:14.324789 7807 utils.go:69] The recommended value for "clusterDNS" in "KubeletConfiguration" is: [10.233.0.10]; the provided value is: [169.254.25.10] [kubelet-start] Writing kubelet configuration to file "/var/lib/kubelet/config.yaml" [kubelet-start] Writing kubelet environment file with flags to file "/var/lib/kubelet/kubeadm-flags.env" [kubelet-start] Starting the kubelet [kubelet-start] Waiting for the kubelet to perform the TLS Bootstrap... This node has joined the cluster: * Certificate signing request was sent to apiserver and a response was received. * The Kubelet was informed of the new secure connection details. Run 'kubectl get nodes' on the control-plane to see this node join the cluster. [k8s-node2 192.168.93.64] MSG: [preflight] Running pre-flight checks [WARNING SystemVerification]: this Docker version is not on the list of validated versions: 20.10.7. Latest validated version: 19.03 [preflight] Reading configuration from the cluster... [preflight] FYI: You can look at this config file with 'kubectl -n kube-system get cm kubeadm-config -o yaml' W0729 12:55:14.405503 7639 utils.go:69] The recommended value for "clusterDNS" in "KubeletConfiguration" is: [10.233.0.10]; the provided value is: [169.254.25.10] [kubelet-start] Writing kubelet configuration to file "/var/lib/kubelet/config.yaml" [kubelet-start] Writing kubelet environment file with flags to file "/var/lib/kubelet/kubeadm-flags.env" [kubelet-start] Starting the kubelet [kubelet-start] Waiting for the kubelet to perform the TLS Bootstrap... This node has joined the cluster: * Certificate signing request was sent to apiserver and a response was received. * The Kubelet was informed of the new secure connection details. Run 'kubectl get nodes' on the control-plane to see this node join the cluster. [k8s-node3 192.168.93.65] MSG: node/k8s-node3 labeled [k8s-node2 192.168.93.64] MSG: node/k8s-node2 labeled [k8s-master2 192.168.93.61] MSG: [preflight] Running pre-flight checks [WARNING SystemVerification]: this Docker version is not on the list of validated versions: 20.10.7. Latest validated version: 19.03 [preflight] Reading configuration from the cluster... [preflight] FYI: You can look at this config file with 'kubectl -n kube-system get cm kubeadm-config -o yaml' W0729 12:55:13.793985 8825 utils.go:69] The recommended value for "clusterDNS" in "KubeletConfiguration" is: [10.233.0.10]; the provided value is: [169.254.25.10] [preflight] Running pre-flight checks before initializing the new control plane instance [preflight] Pulling images required for setting up a Kubernetes cluster [preflight] This might take a minute or two, depending on the speed of your internet connection [preflight] You can also perform this action in beforehand using 'kubeadm config images pull' [download-certs] Downloading the certificates in Secret "kubeadm-certs" in the "kube-system" Namespace [certs] Using certificateDir folder "/etc/kubernetes/pki" [certs] Generating "front-proxy-client" certificate and key [certs] Generating "apiserver" certificate and key [certs] apiserver serving cert is signed for DNS names [k8s-master1 k8s-master1.cluster.local k8s-master2 k8s-master2.cluster.local k8s-master3 k8s-master3.cluster.local k8s-node1 k8s-node1.cluster.local k8s-node2 k8s-node2.cluster.local k8s-node3 k8s-node3.cluster.local kubernetes kubernetes.default kubernetes.default.svc kubernetes.default.svc.cluster.local lb.kubesphere.local localhost] and IPs [10.233.0.1 192.168.93.61 127.0.0.1 192.168.93.60 192.168.93.62 192.168.93.63 192.168.93.64 192.168.93.65] [certs] Generating "apiserver-kubelet-client" certificate and key [certs] Valid certificates and keys now exist in "/etc/kubernetes/pki" [certs] Using the existing "sa" key [kubeconfig] Generating kubeconfig files [kubeconfig] Using kubeconfig folder "/etc/kubernetes" [kubeconfig] Writing "admin.conf" kubeconfig file [kubeconfig] Writing "controller-manager.conf" kubeconfig file [kubeconfig] Writing "scheduler.conf" kubeconfig file [control-plane] Using manifest folder "/etc/kubernetes/manifests" [control-plane] Creating static Pod manifest for "kube-apiserver" [control-plane] Creating static Pod manifest for "kube-controller-manager" [control-plane] Creating static Pod manifest for "kube-scheduler" [check-etcd] Skipping etcd check in external mode [kubelet-start] Writing kubelet configuration to file "/var/lib/kubelet/config.yaml" [kubelet-start] Writing kubelet environment file with flags to file "/var/lib/kubelet/kubeadm-flags.env" [kubelet-start] Starting the kubelet [kubelet-start] Waiting for the kubelet to perform the TLS Bootstrap... [control-plane-join] using external etcd - no local stacked instance added [upload-config] Storing the configuration used in ConfigMap "kubeadm-config" in the "kube-system" Namespace [mark-control-plane] Marking the node k8s-master2 as control-plane by adding the labels "node-role.kubernetes.io/master=''" and "node-role.kubernetes.io/control-plane='' (deprecated)" [mark-control-plane] Marking the node k8s-master2 as control-plane by adding the taints [node-role.kubernetes.io/master:NoSchedule] This node has joined the cluster and a new control plane instance was created: * Certificate signing request was sent to apiserver and approval was received. * The Kubelet was informed of the new secure connection details. * Control plane (master) label and taint were applied to the new node. * The Kubernetes control plane instances scaled up. To start administering your cluster from this node, you need to run the following as a regular user: mkdir -p $HOME/.kube sudo cp -i /etc/kubernetes/admin.conf $HOME/.kube/config sudo chown $(id -u):$(id -g) $HOME/.kube/config Run 'kubectl get nodes' to see this node join the cluster. [k8s-master3 192.168.93.62] MSG: [preflight] Running pre-flight checks [WARNING SystemVerification]: this Docker version is not on the list of validated versions: 20.10.7. Latest validated version: 19.03 [preflight] Reading configuration from the cluster... [preflight] FYI: You can look at this config file with 'kubectl -n kube-system get cm kubeadm-config -o yaml' W0729 12:55:26.526823 8746 utils.go:69] The recommended value for "clusterDNS" in "KubeletConfiguration" is: [10.233.0.10]; the provided value is: [169.254.25.10] [preflight] Running pre-flight checks before initializing the new control plane instance [preflight] Pulling images required for setting up a Kubernetes cluster [preflight] This might take a minute or two, depending on the speed of your internet connection [preflight] You can also perform this action in beforehand using 'kubeadm config images pull' [download-certs] Downloading the certificates in Secret "kubeadm-certs" in the "kube-system" Namespace [certs] Using certificateDir folder "/etc/kubernetes/pki" [certs] Generating "apiserver" certificate and key [certs] apiserver serving cert is signed for DNS names [k8s-master1 k8s-master1.cluster.local k8s-master2 k8s-master2.cluster.local k8s-master3 k8s-master3.cluster.local k8s-node1 k8s-node1.cluster.local k8s-node2 k8s-node2.cluster.local k8s-node3 k8s-node3.cluster.local kubernetes kubernetes.default kubernetes.default.svc kubernetes.default.svc.cluster.local lb.kubesphere.local localhost] and IPs [10.233.0.1 192.168.93.62 127.0.0.1 192.168.93.60 192.168.93.61 192.168.93.63 192.168.93.64 192.168.93.65] [certs] Generating "apiserver-kubelet-client" certificate and key [certs] Generating "front-proxy-client" certificate and key [certs] Valid certificates and keys now exist in "/etc/kubernetes/pki" [certs] Using the existing "sa" key [kubeconfig] Generating kubeconfig files [kubeconfig] Using kubeconfig folder "/etc/kubernetes" [kubeconfig] Writing "admin.conf" kubeconfig file [kubeconfig] Writing "controller-manager.conf" kubeconfig file [kubeconfig] Writing "scheduler.conf" kubeconfig file [control-plane] Using manifest folder "/etc/kubernetes/manifests" [control-plane] Creating static Pod manifest for "kube-apiserver" [control-plane] Creating static Pod manifest for "kube-controller-manager" [control-plane] Creating static Pod manifest for "kube-scheduler" [check-etcd] Skipping etcd check in external mode [kubelet-start] Writing kubelet configuration to file "/var/lib/kubelet/config.yaml" [kubelet-start] Writing kubelet environment file with flags to file "/var/lib/kubelet/kubeadm-flags.env" [kubelet-start] Starting the kubelet [kubelet-start] Waiting for the kubelet to perform the TLS Bootstrap... [control-plane-join] using external etcd - no local stacked instance added [upload-config] Storing the configuration used in ConfigMap "kubeadm-config" in the "kube-system" Namespace [mark-control-plane] Marking the node k8s-master3 as control-plane by adding the labels "node-role.kubernetes.io/master=''" and "node-role.kubernetes.io/control-plane='' (deprecated)" [mark-control-plane] Marking the node k8s-master3 as control-plane by adding the taints [node-role.kubernetes.io/master:NoSchedule] This node has joined the cluster and a new control plane instance was created: * Certificate signing request was sent to apiserver and approval was received. * The Kubelet was informed of the new secure connection details. * Control plane (master) label and taint were applied to the new node. * The Kubernetes control plane instances scaled up. To start administering your cluster from this node, you need to run the following as a regular user: mkdir -p $HOME/.kube sudo cp -i /etc/kubernetes/admin.conf $HOME/.kube/config sudo chown $(id -u):$(id -g) $HOME/.kube/config Run 'kubectl get nodes' to see this node join the cluster. [k8s-node3] generate haproxy manifest. [k8s-node1] generate haproxy manifest. [k8s-node2] generate haproxy manifest. [k8s-node3 192.168.93.65] MSG: kubelet.conf is exists. [k8s-master1 192.168.93.60] MSG: kubelet.conf is exists. [k8s-master2 192.168.93.61] MSG: kubelet.conf is exists. [k8s-node1 192.168.93.63] MSG: kubelet.conf is exists. [k8s-node2 192.168.93.64] MSG: kubelet.conf is exists. [k8s-master3 192.168.93.62] MSG: kubelet.conf is exists. [k8s-master1 192.168.93.60] MSG: configmap/calico-config created customresourcedefinition.apiextensions.k8s.io/bgpconfigurations.crd.projectcalico.org created customresourcedefinition.apiextensions.k8s.io/bgppeers.crd.projectcalico.org created customresourcedefinition.apiextensions.k8s.io/blockaffinities.crd.projectcalico.org created customresourcedefinition.apiextensions.k8s.io/clusterinformations.crd.projectcalico.org created customresourcedefinition.apiextensions.k8s.io/felixconfigurations.crd.projectcalico.org created customresourcedefinition.apiextensions.k8s.io/globalnetworkpolicies.crd.projectcalico.org created customresourcedefinition.apiextensions.k8s.io/globalnetworksets.crd.projectcalico.org created customresourcedefinition.apiextensions.k8s.io/hostendpoints.crd.projectcalico.org created customresourcedefinition.apiextensions.k8s.io/ipamblocks.crd.projectcalico.org created customresourcedefinition.apiextensions.k8s.io/ipamconfigs.crd.projectcalico.org created customresourcedefinition.apiextensions.k8s.io/ipamhandles.crd.projectcalico.org created customresourcedefinition.apiextensions.k8s.io/ippools.crd.projectcalico.org created customresourcedefinition.apiextensions.k8s.io/kubecontrollersconfigurations.crd.projectcalico.org created customresourcedefinition.apiextensions.k8s.io/networkpolicies.crd.projectcalico.org created customresourcedefinition.apiextensions.k8s.io/networksets.crd.projectcalico.org created clusterrole.rbac.authorization.k8s.io/calico-kube-controllers created clusterrolebinding.rbac.authorization.k8s.io/calico-kube-controllers created clusterrole.rbac.authorization.k8s.io/calico-node created clusterrolebinding.rbac.authorization.k8s.io/calico-node created daemonset.apps/calico-node created serviceaccount/calico-node created deployment.apps/calico-kube-controllers created serviceaccount/calico-kube-controllers created毫无疑问,kubernetes是个伟大的开源作品,给作者所在团队中极大地提高了生产力,但在使用过程中,相信很多人跟作者一样,会遇到各种各样的问题,有时候解决的过程也是非常享受,某些问题还可能反复遇到。本篇文章记录了本人在使用开始接触Kubernetes至今遇到的各类问题及解决方案, 希望对其它同学有所帮助。
好记性不如烂笔头,不定期更新
CRD spec.versions: Invalid value

原因: CRD yaml 文件中 apiVersion 与 versions 中的版本不对应
删除 namespaces 时 Terminating,无法强制删除且无法在该 ns 下创建对象

原因: ns 处于 terminating 时 hang 住了,使用
--grace-period=0 --force强制删除也无效解决:
# 导出K8s访问密钥 echo $(kubectl config view --raw -oyaml | grep client-cert |cut -d ' ' -f 6) |base64 -d > /tmp/client.pem echo $(kubectl config view --raw -oyaml | grep client-key-data |cut -d ' ' -f 6 ) |base64 -d > /tmp/client-key.pem echo $(kubectl config view --raw -oyaml | grep certificate-authority-data |cut -d ' ' -f 6 ) |base64 -d > /tmp/ca.pem # 解决namespace Terminating,根据实际情况修改<namespaces> curl --cert /tmp/client.pem --key /tmp/client-key.pem --cacert /tmp/ca.pem -H "Content-Type: application/json" -X PUT --data-binary @/tmp/temp.json https://xxx.xxx.xxx.xxx:6443/api/v1/namespaces/<namespaces>/finalizeDocker 启动时提示 no sockets found via socket activation

解决: 在启动 Docker 前先执行
systemctl unmask Docker.socket即可Prometheus opening storage failed: invalid block sequence

原因: 这个需要排查 Prometheus 持久化目录中是否存在时间超出设置阈值的时间段的文件,删掉后重启即可
Kubelet 提示: The node was low on resource: ephemeral-storage
原因: 节点上 Kubelet 的配置路径超过阈值会触发驱逐,默认情况下阈值是 85%
解决: 或者清理磁盘释放资源,或者通过可修改 Kubelet 的配置参数
imagefs.available来提高阈值,然后重启 Kubelet.参考: https://cloud.tencent.com/developer/article/1456389
kubectl 查看日志时提示: Error from server: Get https://xxx:10250/containerLogs/spring-prod/xxx-0/xxx: dial tcp xxx:10250: i/o timeout
原因: 目地机器的 iptables 对 10250 这个端口进行了 drop,如下图
iptables-save -L INPUT –-line-numbers
解决: 删除对应的规则
iptables -D INPUT 10Service 解析提示 Temporary failure in name resolution

原因: 出现这种情况很奇怪,现象显示就是域名无法解析,全格式的域名能够解析是因为在 pod 的/etc/hosts 中有全域名的记录,那么问题就出在于 CoreDNS 解析上,CoreDNS 从日志来看,没有任何报错,但是从 pod 的状态来看,虽然处于 Running 状态,但是 0/1 可以看出 CoreDNS 并未处于 ready 状态.

可以查看 ep 记录,会发现 Endpoint 那一栏是空的,这也就证实了 K8s 把 CoreDNS 的状态分为了 notready 状态,所以 ep 才没有记录,经过与其它环境比较后发现跟配置有关,最终定位在 CoreDNS 的配置文件上,在插件上需要加上 ready
解决: 在 cm 的配置上添加 read 插件,如下图
# ... 省略 data: Corefile: | .:53 { errors health ready # 加上该行后问题解决 kubernetes cluster.local in-addr.arpa ip6.arpa { pods insecure upstream /etc/resolv.conf fallthrough in-addr.arpa ip6.arpa } # ... 省略关于 CoreDNS 的 ready 插件的使用,可以参考这里
总结起来就是使用 ready 来表明当前已准备好可以接收请求,从 codedns 的 yaml 文件也可以看到有
livenessProbe使用 Kubectl 命令行时提示: Unable to connect to the server: x509: certificate relies on legacy Common Name field, use SANs or temporarily enable Common Name matching with GODEBUG=x509ignoreCN=0
原因: 这个跟本地的 go 环境有关
解决: 在使用 kubectl 前使用命令
export GODEBUG=x509ignoreCN=0即可namespaces \“kube-system\” is forbidden: this namespace may not be deleted
原因: kube-system 是集群中受保护的 ns, 被禁止删除,主要是防止误操作,如果需要删除的话,可以使用 –force
参考: kubernetes/kubernetes#62167/files
unknown field volumeClaimTemplates

原因: 提示这个错误的原因是资源对象是 Deployment, 而 Deployment 本就是无状态的, 所以也就没有使用 pv 这一说法了,可以参考 api
CoreDNS 提示 Loop (127.0.0.1:38827 -> :53) detected for zone “.”

原因: CoreDNS 所在的宿主机上
/etc/resolv.conf中存在有 127.0.xx 的 nameserver,这样会造成解析死循环。解决: 修改宿主机
/etc/resolv.conf或者将 CoreDNS 的 ConfigMap 中的 forward 修改为一个可用的地址, 如8.8.8.8。hostPath volumes are not allowed to be used

原因: 集群中存在 psp 禁止 pod 直接挂载 hostpath.
解决: 通过添加以下的 psp 规则来允许或者删除存在的 psp 都可
apiVersion: extensions/v1beta1 kind: PodSecurityPolicy metadata: name: auth-privilege-psp spec: allowPrivilegeEscalation: true allowedHostPaths: - pathPrefix: / fsGroup: ranges: - max: 65535 min: 1 rule: RunAsAny hostNetwork: true hostPID: true hostPorts: - max: 9796 min: 9796 privileged: true requiredDropCapabilities: - ALL runAsUser: rule: RunAsAny seLinux: rule: RunAsAny supplementalGroups: ranges: - max: 65535 min: 1 rule: RunAsAny volumes: - configMap - emptyDir - projected - secret - downwardAPI - persistentVolumeClaim - hostPathcontainer has runAsNonRoot and image has non-numeric user (grafana), cannot verify user is non-root

原因: 这是由于在 deploy 中设置了
securityContext: runAsNonRoot: true,在这种情况下,当 pod 启动时,使用的默认用户。比如上面的 grafana,K8s 无法确定他是不是 root 用户解决: 指定
securityContext:runAsUser: 1000,随便一个 id 号即可,只要不是 0(0 代表 root)。参考: https://stackoverflow.com/questions/51544003/using-runasnonroot-in-kubernetes
OCI runtime create failed: no such file or directory

原因: /var/lib/Kubelet/pod 下的数据目录已经损坏.
解决: 删除对应的目录即可
镜像拉取时出现 ImageInspectError

原因: 这种情况下一般都是镜像损坏了
解决: 把相关的镜像删除后重新拉取
Kubelet 日志提示: node not found

原因: 这个报错只是中间过程,真正的原因在于 apiserver 没有启动成功,导致会一直出现这个错误
解决: 排查 Kubelet 与 apiserver 的连通是否正常
OCI runtime create failed: executable file not found in PATH

原因: 在 path 中没有 nvidia-container-runtime-hook 这个二进制文件,可能跟本人删除 nvidia 显卡驱动有关.
解决: nvidia-container-runtime-hook 是 Docker nvidia 的 runtime 文件,重新安装即可.
Nginx Ingress Empty address
# kubectl get ingress NAME HOSTS ADDRESS PORTS AGE Prometheus Prometheus.1box.com 80 31d会发现 address 中的 ip 是空的,而查看生产环境时却是有 ip 列表的.
原因: 这个其实不是一个错误,也不影响使用,原因在于测试环境中是不存在 LoadBalancer 类型的 svc, 如果需要 address 中显示 ip 的话需要做些额外的设置
解决:
- 在 nginx controller 的容器中指定启动参数
-report-ingress-status - 在 nginx controller 引用的 ConfigMap 中添加
external-status-address: "10.164.15.220"
这样的话,在 address 中变会显示
10.164.15.220了参考:
nginxinc/kubernetes-ingress#587
Kubelet: but volume paths are still present on disk

原因: 这种 pod 已经被删除了,但是 volume 还存在于 disk 中
解决: 删除对应的目录
/var/lib/Kubelet/pods/3cd73...PLEG is not healthy

原因: 宿主机上面跑的容器太多,导致 pod 无法在 3m 钟内完成生命周期检查
解决: PLEG(Pod Lifecycle Event Generator) 用于 kublet 同步 pod 生命周期,本想着如果是因为时间短导致的超时,那是不是可以直接调整这个时间呢? 查看 Kubelet 的源码发现不太行,3m 时间是写在代码里的因此无法修改,当然修改再编译肯定没问题,但成本太大,所以只得优化容器的调度情况.
metrics-server: 10255 connection refused
unable to fully collect metrics: [unable to fully scrape metrics from source Kubelet_summary:K8s-node-49: unable to fetch metrics from Kubelet K8s-node-49 (xxx.xxx.xxx.49): Get http://xxx.xxx.xxx.49:10255/stats/summary?only_cpu_and_memory=true: dial tcp xxx.xxx.xxx.49:10255: connect: connection refused原因: 现在的 K8s 都默认禁用了 Kubelet 的 10255 端口,出现这个错误是因此在 Kubelet 启动命令中启用了该端口
解决: 将
- --Kubelet-port=10255注释metrics-server: no such host
unable to fetch metrics from Kubelet K8s-node-234 (K8s-node-234): Get https://K8s-node-234:10250/stats/summary?only_cpu_and_memory=true: dial tcp: lookup K8s-node-234 on 10.96.0.10:53: no such host解决: 使用
Kubelet-preferred-address-types=InternalIP,Hostname,InternalDNS,ExternalDNS,ExternalIP参数参考: https://github.com/kubernetes-sigs/metrics-server/blob/master/README.md
pod 无法解析域名
集群中新增了几台机器用于部署 clickhouse 用于做大数据分析,为了不让这类占用大量资源的 Pod 影响其它 Pod,因此选择给机器打 taint 的形式控制该类 Pod 的调度, 创建 Pod 后发现这些 Pod 都会出现 DNS 解析异常,
原因; 要注意容器网络,比如这里使用的是 flannel 是否容忍了这些机器的 taint,不然的话,flannel 是无法被调度到这些机器的,因此容器间的通信会出现问题,可以将类似 flannel 这些的基础 POD 容忍所有的 NoScheule 与 NoExecute
解决: flannel 的 ds yaml 中添加以下 toleration,这样适用任何的场景
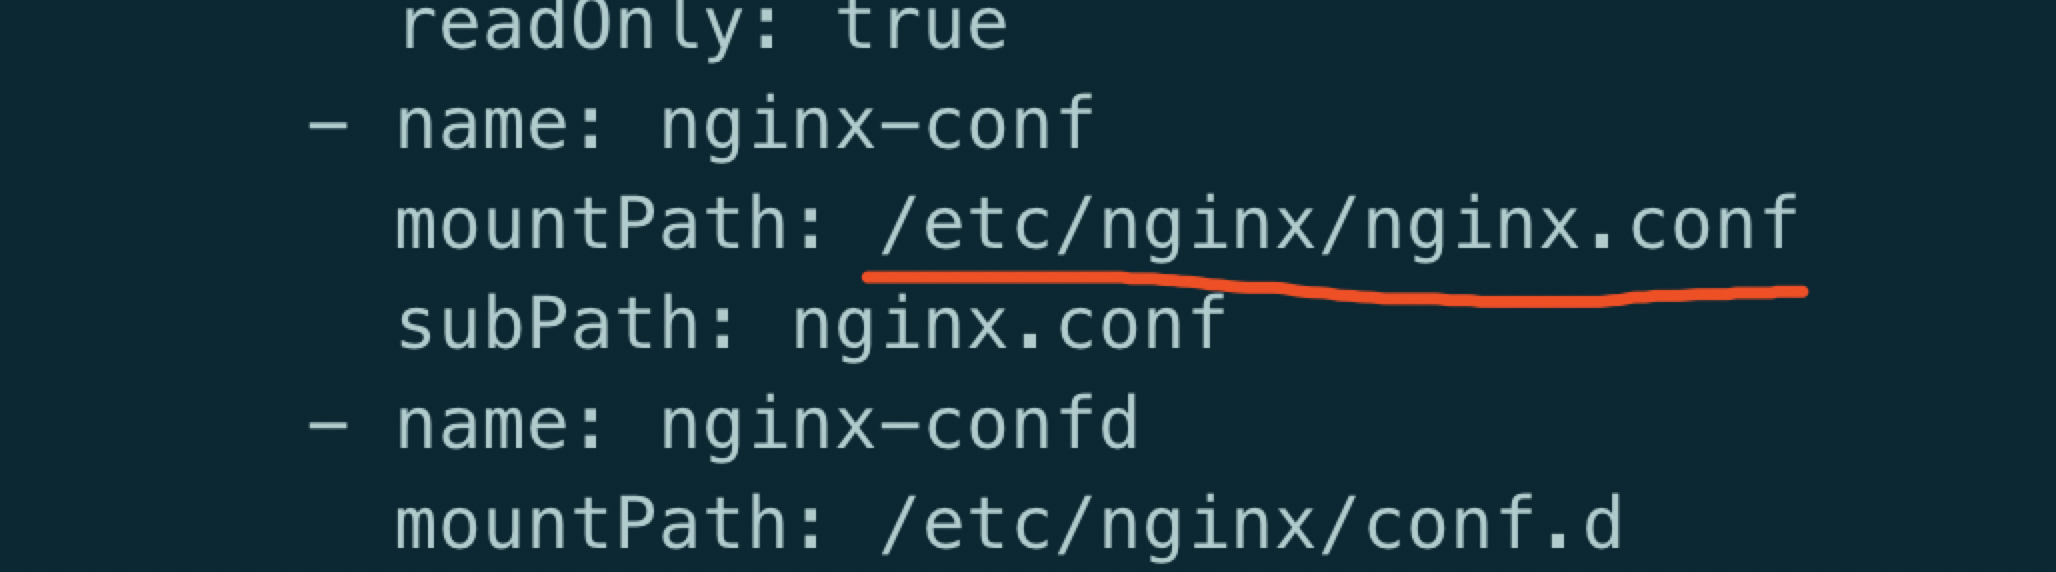
tolerations: - effect: NoSchedule operator: Exists - effect: NoExecute operator: ExistsAre you tring to mount a directory on to a file

原因: Yaml 文件中使用了 subPath, 但是 mountPath 指向了一个目录
解决: mountPath 需要加上文件名
Kubernetes 启动后提示 slice: no such file ro directory

原因: yum 安装的 Kubelet 默认的是 cgroupfs,而 Docker 一般默认的是 systemd。但是 kubernetes 安装的时候建议使用 systemd, Kubelet 跟 Docker 的不一致, 要么修改 Kubelet 的启动参数 , 要么修改 dokcer 启动参数
解决:
- Docker 的启动参数文件为:
/etc/Docker/daemon.json: "exec-opts": ["native.cgroupdriver=systemd”] - Kubelet 的启动参数文件为:
/var/lib/Kubelet/config.yaml: cgroupDriver: systemd
“cni0” already has an IP address different from xxx.xxxx.xxx.xxx

原因: 使用 kubeadm reset 重复操作过, reset 之后,之前 flannel 创建的 bridge device cni0 和网口设备 flannel.1 依然健在
解决: 添加之前需要清除下网络
kubeadm resetsystemctl stop Kubeletsystemctl stop Dockerrm -rf /var/lib/cni/rm -rf /var/lib/Kubelet/*rm -rf /etc/cni/ifconfig cni0 downifconfig flannel.1 downifconfig Docker0 downip link delete cni0ip link delete flannel.1systemctl start Dockersystemctl start Kubeletkubeadm 初始化时提示 CPU 小于 2
[preflight] Running pre-flight checkserror execution phase preflight: [preflight] Some fatal errors occurred: [ERROR NumCPU]: the number of available CPUs 1 is less than the required 2[preflight] If you know what you are doing, you can make a check non-fatal with `--ignore-preflight-errors=...`原因: kubeadm 对资源一定的要求,如果是测试环境无所谓的话,可忽略
解决:
使用 --ignore-preflight-errors 忽略Unable to update cni config: no network found

原因: 还未部署网络插件容器,导致在 /etc/cni 下还没有文件
解决: 根据实际情况部署网络插件
while reading ‘google-Dockercfg’ metadata

原因: 从其它机器访问上述这些 url 确实出现 404
解决: 由于是在 RKE 上部署 K8s, 所以可能会去访问 google 相关的 url, 不影响业务,可以忽略
no providers available to validate pod request

原因: 在 api-server 的启动参数 enable-admission 中设置了 PodSecrityPolicy, 但是集群中又没有任何的 podsecritypolicy,因此导致整个集群都无法新建出 pod
解决: 删除相应的 podsecritypolicy 即可
unable to upgrade connection: Unauthorized

原因: Kubelet 的启动参数少了 x509 认证方式
解决: 配置证书的路径, 加上重启 Kubelet 即可
kubectl get cs 提示<unknown>

原因: 这是个 kubectl 的 bug, 跟版本相关,kubernetes 有意废除 get cs 命令
解决: 目前对集群的运行无影响, 可通过加
-o yaml查看状态安装 kubeadm 时提示 Depends 错误
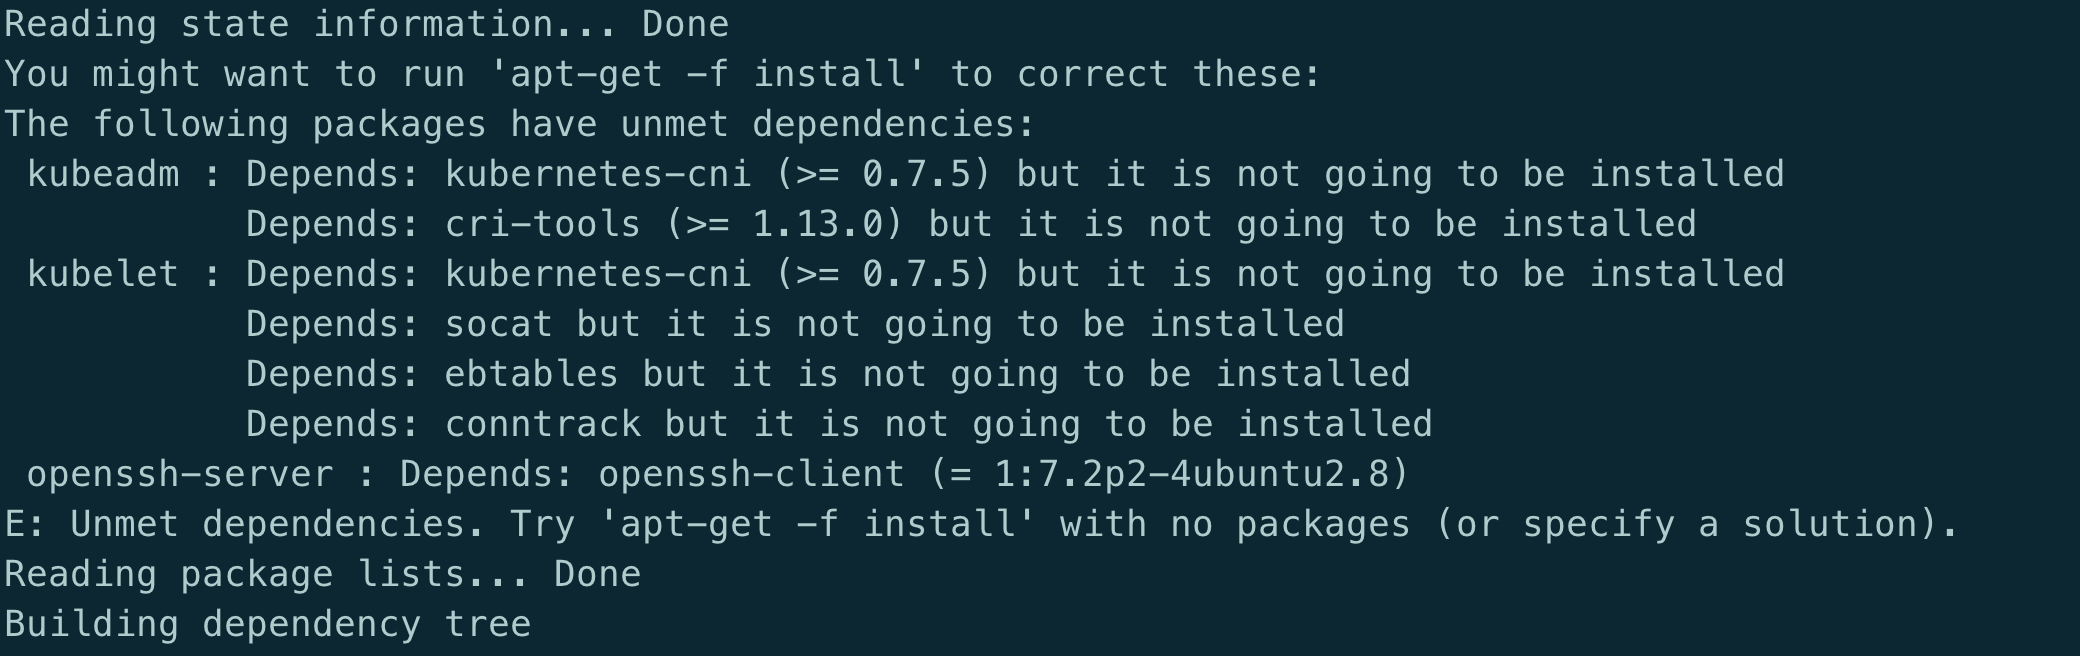
原因: 跟 kubeadm 没多大关系, 系统安装的有问题
解决: 执行以下命令修复
apt --fix-broken installapt-get update访问 service 时提示 Connection refused
现象: 从另一环境中把 yaml 文件导入到新环境后有些 service 访问不通
telnet mongodb-mst.external 27017Trying 10.97.135.242...telnet: Unable to connect to remote host: Connection refused首先排除了域名、端口的配置问题。
会发现提示连接拒绝.可以确定的是集群内的 DNS 是正常的.
那么就是通过 clusterIP 无法到达 realserver. 查看 iptables 规则
发现提示
default has no Endpoints --reject-with icmp-port-unreachable
很奇怪, 提示没有 Endpoints, 但是使用
kubectl get ep又能看到 ep 存在且配置没有问题而且这个 default 是怎么来的.
为了方便部署, 很多配置是从别的环境导出的配置, 有些 service 访问是没问题的, 只有少部分
connection refused。结比一下发现一个很有趣的问题,先来看下不正常的 yaml 文件:
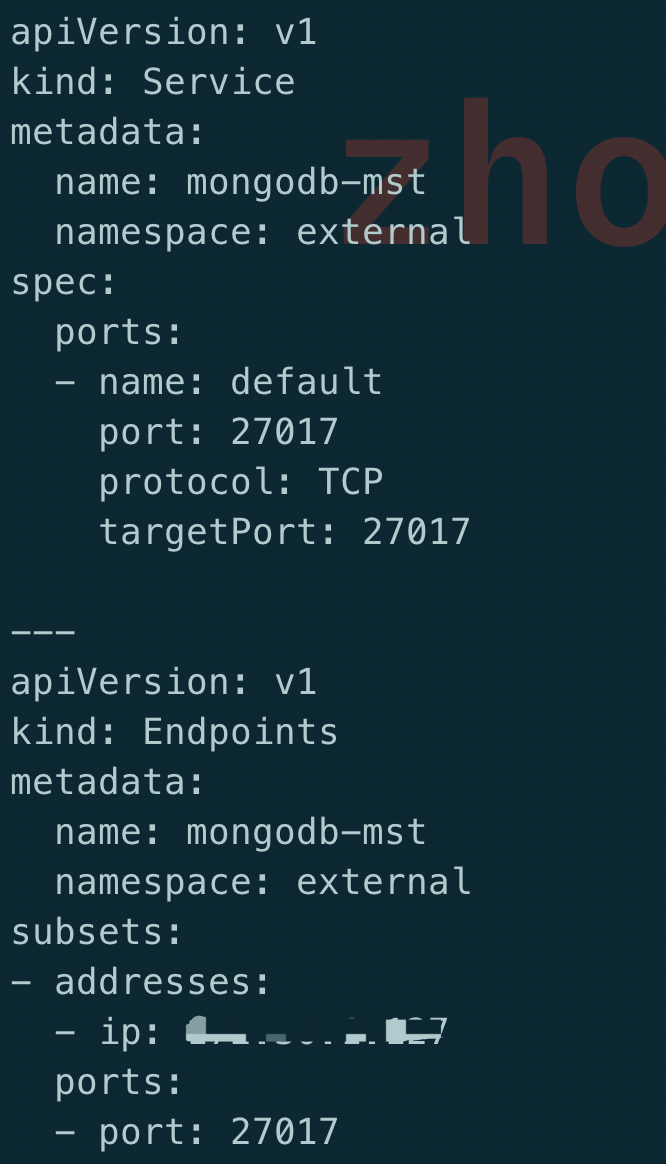
由于服务在集群外部署的, 因此这里使用了 subset 方式, 开始怀疑问题在这里, 但是后来知道这个不是重点
乍一看这个配置没什么问题, 部署也很正常, 但是对比正常的 yaml 文件,发现一个区别:
如果在 services 中的端口指定了名字, 那么在 subsets 中的端口也要带名字, 没有带名字的就会出现
connection refused,这个确实之前从来没有关注过, 一个端口的情况下也不会指定名字而且这面 iptalbes 中提示的 default 刚好就是这里的 port name,虽然不敢相信,但是也只能试一试这个方法: 在 subsets 中也加了 port name
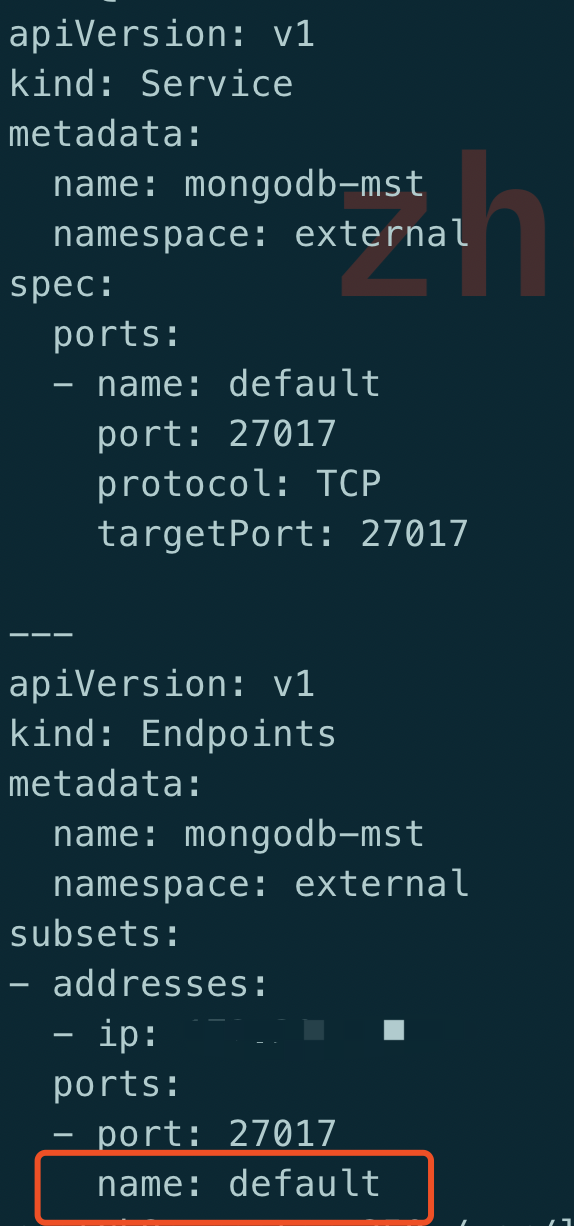
重新部署一个,再次查看 iptalbes 规则
iptables-save|grep mongodb-mst
OMG, 居然可行, 再看下 telnet 的结果:
Trying 10.105.116.92...Connected to mongodb-mst.external.svc.cluster.local.Escape character is '^]'.访问也是没问题, 那么原因就在于:
在 service 中指定了 port name 时, 也需要在 ep 中指定 port name
error converting fieldPath: field label not supported
今天遇到一个部署 Deployment 出错的问题, yaml 文件如下:
apiVersion: apps/v1kind: Deploymentmetadata: name: demo-Deployment namespace: 4test labels: app: config-demo-appspec: replicas: 1 selector: matchLabels: app: config-demo-app template: metadata: labels: app: config-demo-app annotations: # The field we'll use to couple our ConfigMap and Deployment configHash: 4431f6d28fdf60c8140d28c42cde331a76269ac7a0e6af01d0de0fa8392c1145 spec: containers: - name: config-demo-app image: gcr.io/optimum-rock-145719/config-demo-app ports: - containerPort: 80 envFrom: # The ConfigMap we want to use - configMapRef: name: demo-config # Extra-curricular: We can make the hash of our ConfigMap available at a # (e.g.) debug Endpoint via a fieldRef env: - name: CONFIG_HASH #value: "4431f6d28fdf60c8140d28c42cde331a76269ac7a0e6af01d0de0fa8392c1145" valueFrom: fieldRef: fieldPath: spec.template.metadata.annotations.configHash提示以下错误:

会提示
Unsupported value:spec.template.metadata.annotations.configHash。目的很简单: container 中的环境变量中引用 configHash 变量, 这个值是当 ConfigMap 变更时比对两个不同的 sha 值以此达到重启 pod 的目的, 但 fieldPath 显然不支持
spec.template.metadata.annotations.configHash。从报错提示来看, 支持列表有
metadata.name, metadata.namespace, metadata.uid, spec.nodeName,spec.serviceAccountName, status.hostIp, status.PodIP, status.PodIPs。这些值用于容器中需要以下信息时可以不从 K8s 的 apiserver 中获取而是可以很方便地从这些变量直接获得。
参考:
- https://www.magalix.com/blog/kubernetes-patterns-the-reflection-pattern
- https://kubernetes.io/docs/tasks/inject-data-application/downward-api-volume-expose-pod-information/
参考文章:
- https://www.ibm.com/docs/en/cloud-private/3.2.0?topic=console-namespace-is-stuck-in-terminating-state
- https://kubernetes.io/docs/tasks/extend-kubernetes/custom-resources/custom-resource-definition-versioning/
- kubernetes/kubernetes#19317
- http://www.xuyasong.com/?p=1725
- https://kubernetes.io/
- https://fuckcloudnative.io/
- https://www.cnblogs.com/breezey/p/8810039.html
- https://ieevee.com/tech/2018/04/25/downwardapi.html
- https://www.magalix.com/blog/kubernetes-patterns-the-reflection-pattern
- https://kubernetes.io/docs/reference/generated/kubernetes-api/v1.19/#Deploymentspec-v1-apps
- https://kubernetes.io/docs/tasks/inject-data-application/downward-api-volume-expose-pod-information/
- kubernetes/kubernetes#62167/files
- https://github.com/kubernetes-sigs/metrics-server/blob/master/README.md
- RickK零S
那遇到这个问题的时候,帮忙进行如下操作来排查问题所在:
- 检查 Jenkins 的状态是否正常,包括但不限于:CPU、内存、磁盘的使用率
- 在 ks-apiserver 中访问图中提示的 URL
- RickK零S
大家可以关注这个 issue
kubesphere/kubesphere#3259johnniang
在build docker images的是时候替换
RUN sed -i “s/app_name/$app_name/g” logback-spring.xml
变量是由自动化参数定义的 faweizhao26K零S
- 已编辑
SIG-Serverless 例会通知
小组首次社区例会:讨论 OpenFunction Dapr runtime 及 Function Framework 的实现
Time
June 3rd, 2021 10:30 A.M. Beijing Time
会议链接
https://us02web.zoom.us/j/87437196365?pwd=UndDL2puMXlqcSt5U3JaYUdRNk85Zz09
Meeting ID: 874 3719 6365
Passcode: kubesphere欢迎对云原生 Serverless 感兴趣的社区同学加入例会!